How to: Install Windows on Mac via Boot Camp

A Mac is built for compatibility, supporting all industry standards; Mac OS X is almost fully compatible to windows. For those for whom even this isn’t enough, there is Boot Camp. Boot Camp is a utility included in Mac OS X 10.5 Leopard onwards that allows you to dual boot Microsoft Windows with Mac OS X. It guides you through easy re-partitioning for windows, assists you by installing a boot loader so that you can choose the OS to boot into at the time of startup, and adds a Boot Camp control to the Microsoft windows control panel so that these settings can be modified from there also.

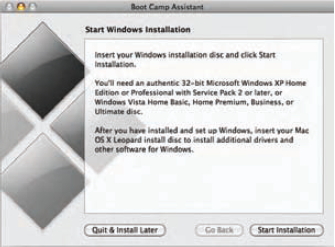
Here is how to go about dual booting Windows on your Mac. Go to Application/Utilities from your task bar and run the Boot Camp Assistant over there. It is a simple wizard like interface that takes you through the following processes.

bootcamp-install

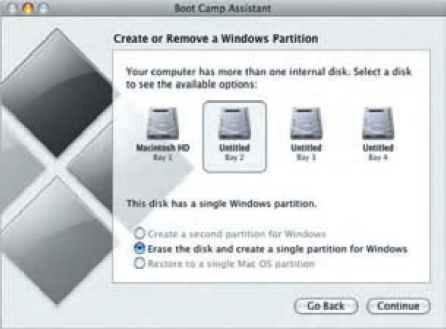
1. Creating a partition on your hard disk for Windows: Allowing for nondestructive re-partitioning of your hard disk (without losing any data), this menu comes with three options, you can choose to use a 32 GB partition for Windows, split the hard disk 50-50 between Windows and Mac OS, or manually choose a size. When manually choosing a size, remember to make the Windows partition at least 5 GB in size, while the partition with Mac OS currently installed in it should at least have 5 GB left free. If you have multiple internal hard disks, it is advisable to keep your Windows partition on a different disk.
bootcamp-partition

2. Start Installing Windows: Once partitioning is done, you will be back to the main Boot Camp menu, from where you have to select “Start the Windows Installer”. Follow the menu until you are asked to insert your Windows disk. Soon your computer will restart and boot from the Windows DVD.

(Note that if you are attempting to install Windows XP, it has to be SP2. You cannot install a basic Windows XP and attempt to upgrade to SP2 later.)

bootcamp-win-format

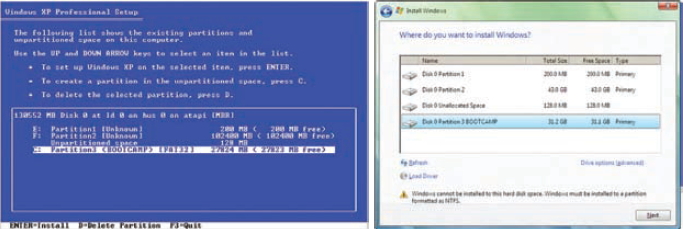
3. Choosing your partition: Follow the simple on screen instructions until you arrive at the choose partition menu.

You need to be careful doing this step. Select only the partition labeled – Partition* <BOOTCAMP> (where * is a number such as 1,2,3). Only one partition will have a name in that format. Choosing any other partition might wipe out your Mac OSX along with all your data from your computer. If you are installing Windows 7, the partition will appear as Disk * Partition * BOOTCAMP.


4. Formatting your Partition: Now you will be asked if you want this drive to be FAT or NTFS, i.e. to choose its file system. Windows 7 requires NTFS, so it will by default format your partition as NTFS without asking you. Also if the partition is 32 GB or more in size, it has to be NTFS. However, if the disk is made NTFS, it will be read only (you cannot modify files or write new ones) while running Mac OS X. So make your choice wisely.


5. Installing Drivers: Your Mac OS X CD that came with your Mac also contains windows drivers and Boot Camp components to ensure flawless functioning of windows on your system. To install these drivers, once you are logged into Windows, (after the whole installation process is over), insert he Mac OS X DVD. If auto run is disabled, you will have to open the drive in my computer and run setup.exe manually for drivers.
 

bootcamp-startup

Otherwise, it will start automatically. The setup will install drivers for all your built in Mac components. However, some external add on peripherals such as external iSight webcams might not be supported this way. You are advised to go to the Apple web site for these drivers. Your computer might need to restart few times.

bootcamp-controlpanel

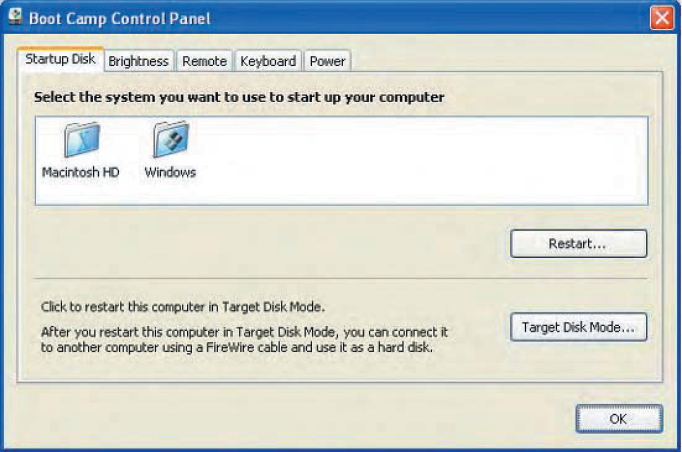
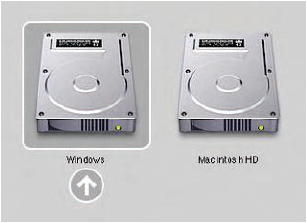
6. Setting up your default start up: Thanks to the Boot Camp control panel installed in your Windows control panel, this can be done from both Windows and Mac OS X. In Mac, go to System Preferences > start up disk (found either on the dock or using finder). In the menu that shows up, you can choose your default operating system. In Windows, this can be done using Control Panel > Boot Camp Control Panel. This menu also offers you the unique feature of using your computer as a target disk. To do this, select the disk of choice, Windows or Mac OS X and click target disk mode.

Once your computer restarts, you may use its fire wire port to connect it to any other computer and use it as an external hard disk. This may be done in extreme cases for data recovery or restoration.

You can also quickly boot into Mac OS X while using windows by right clicking the Boot Camp system tray icon and choosing restart in Mac OS X.

An alternative is Vmware Fusion. It also has many of the popular features such as support for Boot Camp. However, many of the seamless virtualization features such as coherence are missing.


Note: Before installing Boot Camp, always back up important data. “Precaution is better than cure.”
 

How to check if two PCs are connected in a network

So you are trying to establish a network between two computers and you have no idea whether they are setup correctly. To check if the connection is able to send and receive data, windows have a inbuilt service through which we can check the connectivity by sending and receiving some bytes of data from your pc to target computer.

If you have wired them through switch or router, you should always first check the LED on  Ethernet port. That LED should be blinking in most of the cases but if it’s not then you might have not connected them properly.

Follow these simple steps to check even if they are connected wirelessly:

1)      Get the IP of target machine.

2)      Open Command Prompt, by hitting (Windows+R) key and then typing cmd. Windows key is placed besides ALT key or you can go to Start > All Programs > Accessories > Command Prompt.

no-connection

Request timed out because of connection errors.

3)      Once the Command prompt is open, type “ping <ip address of target machine>”. For example :

ping 192.168.1.3
connected

Connected successfully! For the sake of example i am pinging to my myself.

It will start sending some packets to the machine , if the response is received it means your connection is working fine. But if request timed out then there might be some problem.

How To: Edit default location for installing Apps permanently

Fed up of changing the location of directory where your game or application should be installed? Then this solution is for you, as the size of hard drives increase, more people are using partitions to separate and store groups of files.

Windows uses the C:\Program Files directory as the default base directory into which new programs are installed. However, you can change the default installation drive and/ or directory by using a Registry hack.

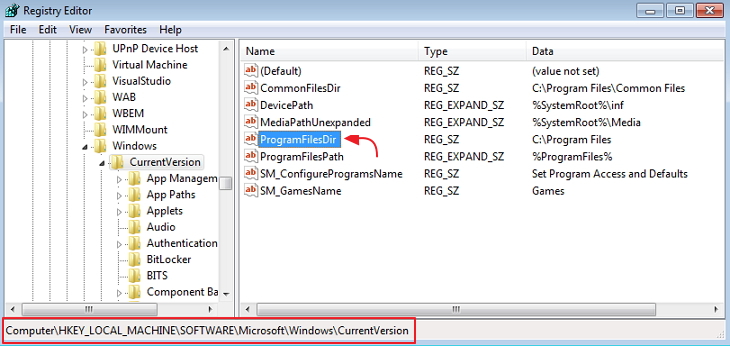
Run the Registry Editor (regedit)and go to

HKEY_LOCAL_MACHINE\SOFTWARE\Microsoft\Windows\CurrentVersion

change-default-installation-dir

Look for the value named ProgramFilesDir. by default,this value will be C:\Program Files.

change-default-installation-dir

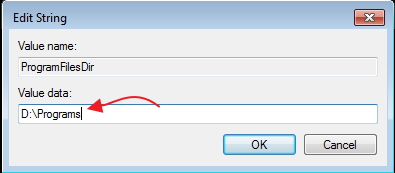
Edit the value to any valid drive or folder and XP will use that new location as the default installation directory for new programs.

Don’t forget to take backup of registry first in case you messed up.


Howto : Use USB Drive as a Hardware key for computer

Windows has an inbuilt system utility called SysKey that can help you use a normal pen drive as an access device instead of a regular text based password. To do this

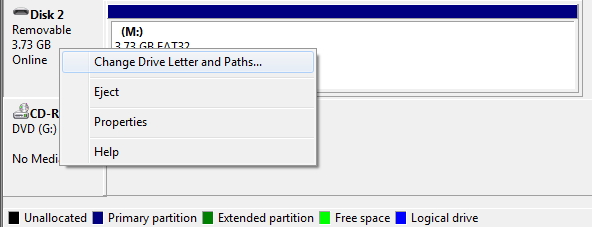
  • First step is to assign A: as your removable disk drive. This is because the utility was designed to work with floppy drives.

change-drive-letter

  • To do this hit [Window] key and type “disk management” and press enter. Right click the relevant drive name of USB and change drive letter.
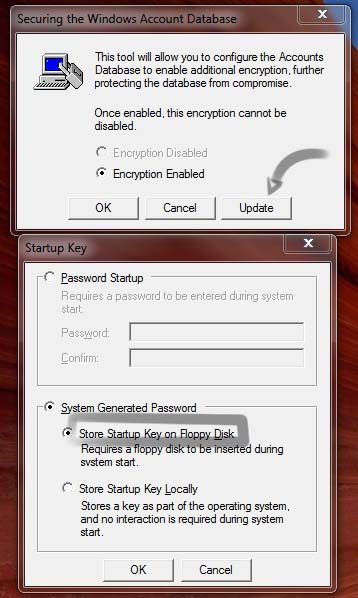
  • Now hit the [Window] key again and type Syskey and press Enter.

syskey-store-usb

  • Click update –> Store key on Floppy Disk. Click OK

After this a file called Startkey.key will be created on your pendrive and your PC won’t boot into your desktop unless the pen-drive is plugged into your system.

To revert back , just follow above procedure again and set STORE STARTUP KEY LOCALLY.

How to Restrict Hard Drives in Windows 7 for User Accounts

You can restrict access to a hard drive in Windows 7 for other user accounts in the same computer. This is useful if you have files on a hard drive that you do not want anyone else to access. Only specified user or Administrator will be able to access these. You can also change other settings, such as only allowing a user to view a file and not change it.

Steps to Follow :

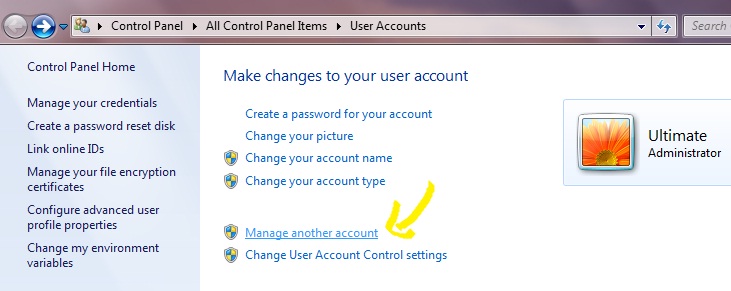
  • Log on to your computer with an account with Administrator rights. Click “Start,” type “user” (without quotes) in the automatically selected “Search programs and files” search box and click “User Accounts.” Click “Manage another account.”


  • Click “Create a new account,” if you need to create a user account for other people that will be using the computer. If you already have another account set up, go to the next step. You need to have at least your user account and another one set up to restrict access to a drive. Type a name for the user and click “Create Account.”

  • Click “Start” and “Computer.” Right-click the name of the hard drive you want to restrict access to. Click “Properties.”

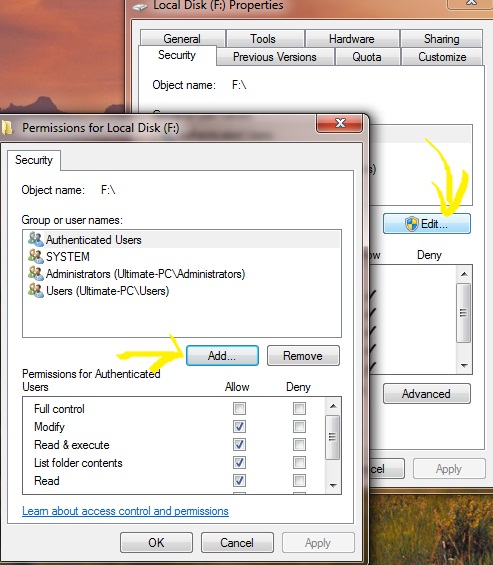
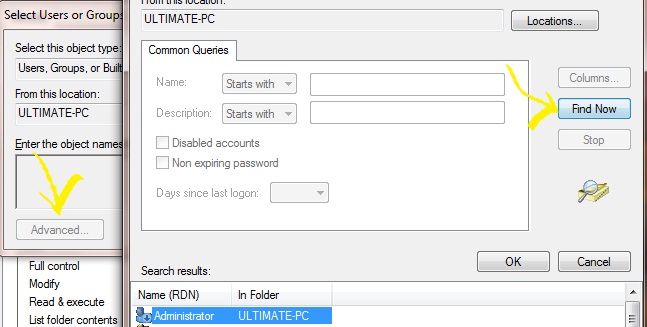
  • Click the “Security tab” in the “Properties” window that opened. Click “Edit…” and “Add…” in the “Select Users or Groups” window that opened.
Restrict-Hard-Drives-in-Windows-7-1
  • Type the name of the other user account on your computer or you can click “Advanced” and then “Find Now”, then select your user account. Click “OK.” Uncheck the boxes to the left of any options that you do not want the user to have available. Check the “Deny” box for “Full control” to disable all control from the user for files on the hard drive.
Restrict-Hard-Drives-in-Windows-7
  • Click “OK,” “Yes” and “OK.” Close any open windows. Click “Start,” log off of your account and log on as the other user to test your settings.

  • Click “Start,” “Computer” and double-click the name of the hard drive you restricted access to. A window indicating that “Access is denied” is shown. Close the window and log off the computer.

And you are done.

How to change permissions in Windows 7

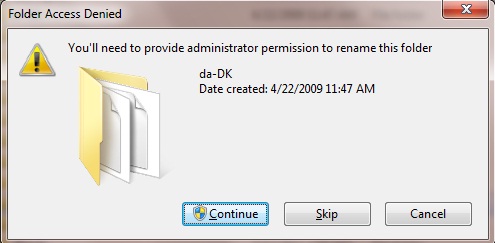
If you are a Windows 7 user, then you are most likely to be aware of the fact that you need to TAKE OWNERSHIP of files and folders before you can make any changes to them. This feature was introduced first in Windows Vista and later in Windows 7 in order to prevent any unauthorized changes from being made to the system files.

  • Right-click the file or folder on which you want to take the ownership and then click on Properties.

  • Now go to the Security tab, click on Advanced button and then click the Owner tab.
  • Now, click on Edit and do the following:
    • Under the “Change owner to:” section, select the user or group to which you would like to grant the permissions and then click on the OK button.

    • If the user or the group to which you would like to grant permissions is not listed under the Change owner to: section, just click on Other users and groups and, under Enter the object name to select (examples), type the name of the user or group, and then click OK.
  • Now you should get the confirmation dialog box stating that the ownership is granted.

How to Change the Logon Screen of Windows 7

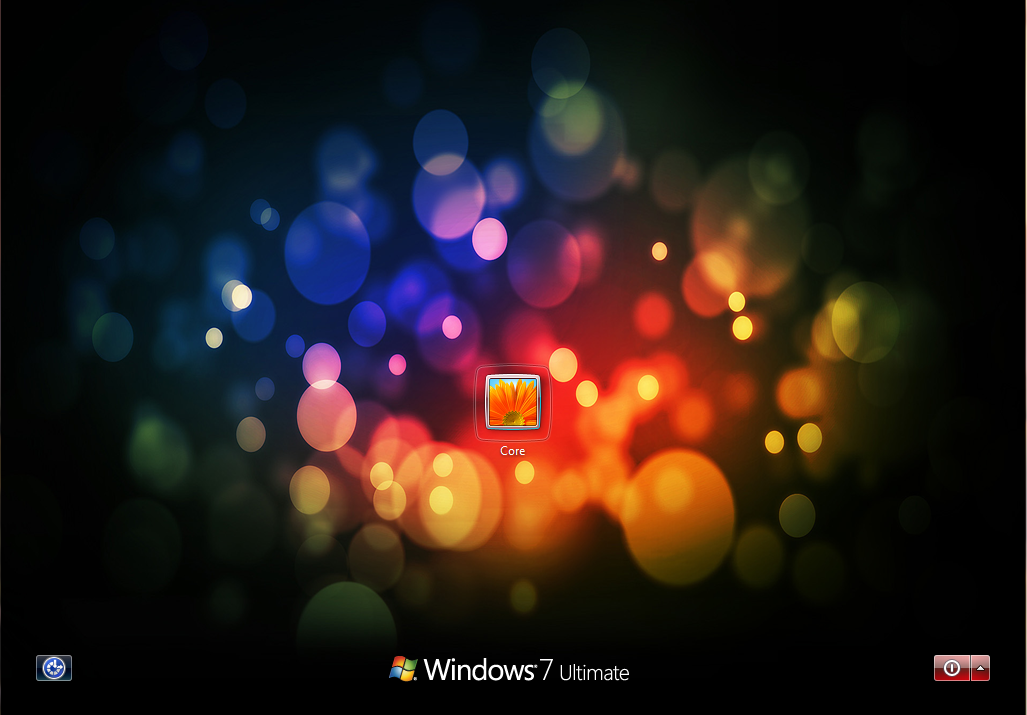
How would you like to change the logon screen background in Windows 7 so as to give your Windows a customized look and feel? With a small tweak it is possible to customize the Windows 7 logon screen and set your own picture/wallpaper as the background.

Changing logon screen background in Windows 7 is as simple as changing your desktop wallpaper. Well, here is a step-by-step instruction to customize the logon screen background:

  1. The image you need to set as the background should be a .jpg file and its size should not exceed 245KB, it can be smaller.
  2. The image resolution can be anything of your choice. However I prefer 1440 x 900 or 1024 x 768. You can use any of the photo editing software such as Photoshop to compress and set the resolution for your image. Once you’re done, save this image as backgroundDefault.jpg. (Rename it, otherwise it won’t work)
  3. You will need to copy this image to the following location:
    C:\Windows\system32\oobe\info\backgrounds

    You will need to create that path if it does not already exist on your computer.

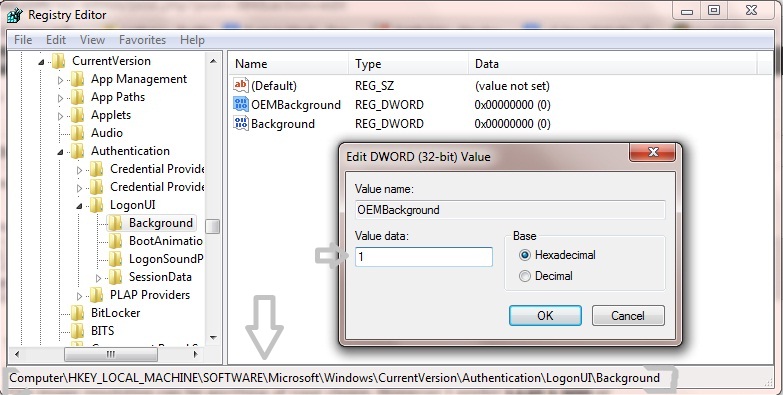
  4. Now, open the Registry Editor (Start -> Run -> Type regedit) and navigate to the following key:
    HKLM\Software\Microsoft\Windows\CurrentVersion\Authentication\
    LogonUI\Background

    If the key Background does not exist, then right-click on LogonUI, select New -> Key, and then name it as Background.

    Now locate OEMBackground (listed on the right side). If it does not exist, right-click Background and selectNew -> DWORD and name it OEMBackground.

    Win7Logon-Registry


  5. Double-click on OEMBackground and set the Value Data to 1.
  6. Now log-off to see the new logon screen background. If you would like to revert back to the default background, just set the Value Data back to 0.


How to Access Shared Folders of Windows 7 and Stream Videos on Android over wifi

Want to play videos from your computer on your Android, without the hassle of copying them to your device’s internal storage? Share a folder over the network with Windows. You can copy files back and forth over Wi-Fi, too.


Sharing Folders on Windows 7

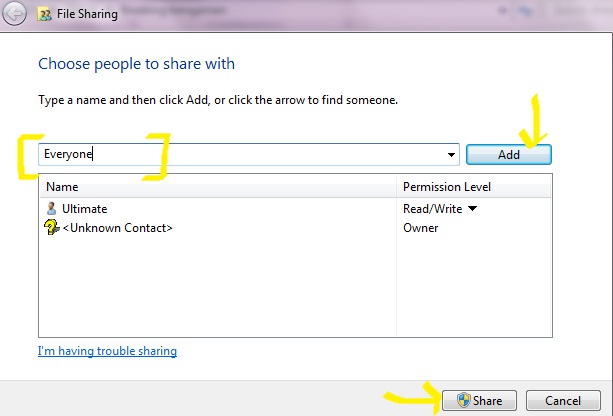
To share a folder and make it accessible from Android, you’ll need to share it with “Everyone.”
To do this, navigate to the folder you want to share, click the Share with menu, and select Specific people.

windows android stream

Enter “Everyone” in the box and click the Add button. Select Everyone by clicking on it.

By default, Everyone will only have Read permissions – if you also want to copy files from your Android to the shared folder, you can change the permission level to Read/Write.

Click the Share button after configuring your permissions.

win-droid-share

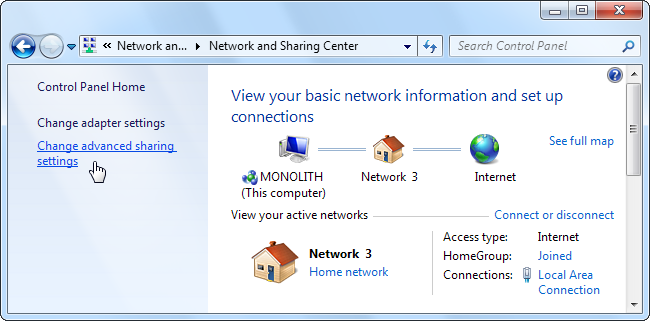
Next, go to the Network and Sharing Center. Click Start, type “Network and Sharing” and press Enter to quickly open it.

win-droid-share

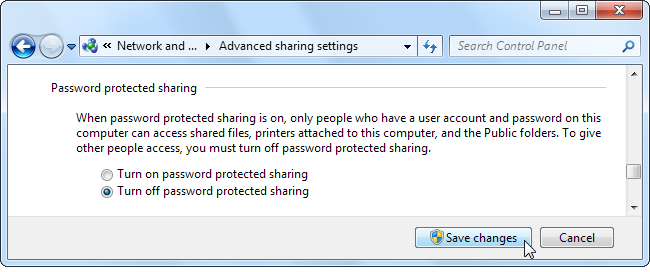
In the Advanced sharing settings, you may want to disable password-protected sharing. If you disable password-protected sharing, only folders you share with “Everyone” will be accessible without a password.

You can also try leaving password-protected sharing enabled, in which case you’ll need to enter user account credentials before connecting to your shared folder on Android. This may work, although I couldn’t get it to work, myself.

win-droid-share


Accessing Shared Folders on Android

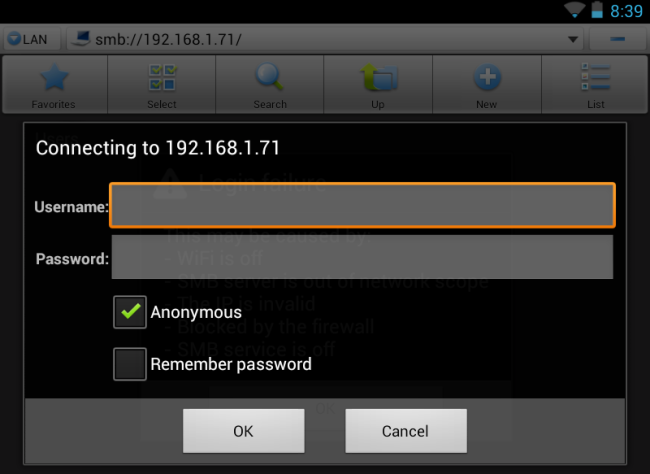
To access the shared folder on Android, we’ll use ES File Explorer. It’s high-quality, free, and supports Windows shared folders with the SMB protocol.

From ES File Explorer’s main screen, swipe from the right to the left to access the LAN section. You can also tap the Local option at the top left corner of the screen and select LAN in the list.

Tap the New button on the toolbar in the LAN Shares section and select Scan to scan your network for PCs sharing files. You can also tap New and select Server to enter your computer’s IP address manually.


After the scan is complete, tap a computer to view its shared files. If ES File Explorer finds your computer but continues scanning for more computers, tap the screen to stop the scan process.

win-droid-share

Log in as Anonymous if you disabled password-protected sharing earlier. If you didn’t, try to log in with your Windows username and password – this never worked for me, however.

Browse to the folder you shared in your computer’s file system. I shared my D drive, so I’d tap D, tap my user account’s name.

While we can see other shares like C$ here, they aren’t accessible. We’d see an error message if we tried to access them anonymously.

Tap a video, music file, image, text file, or any other type of file to view it. You can also long-press a file to view a menu and optionally copy it to your device.


If you tap a file type Android supports – such as an MP4 video file – it will open immediately and start streaming to your device.

How to Export/Backup Windows Registry

The Windows Registry is a hierarchical database that stores configuration settings and options on Microsoft Windows operating systems. It contains settings for low-level  operating system components as well as the applications running on the platform: the kernel, device drivers, services, SAM, user interface and third party applications all use the registry. The registry also provides a means to access counters for profiling system performance.

Its easy and fast, you can make a backup file for all of your registries stored in OS. You can also select a specific registry to backup if you want to.

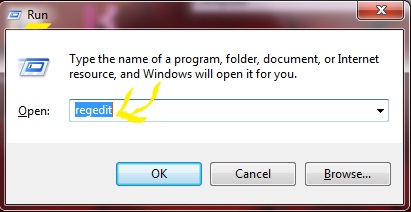
Step 1 : Go to Start and enter ‘regedit’ in search bar or press Win+R to open RUN then type regedit and hit enter.

Regedit

(Optional)Step 2 : Windows will ask you to allow executing it, select YES. A new window of Registry Editor will open.

Step 3 : You can see the window is divided into two parts, left one looks like a hierarchy of all registry stored. If you want to backup a specfic one then find it and select it otherwise click My Computer.

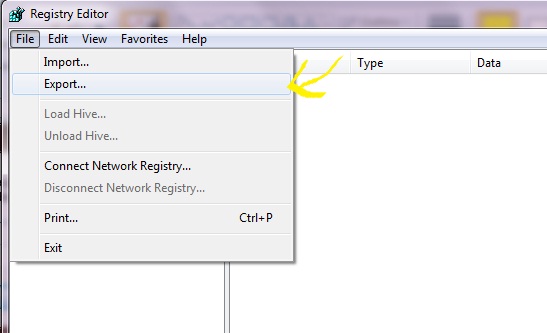
Regedit export

Step 4 : Now Go to File >Export. Browse the location where you want to export your backup and click SAVE. It will take 2-3 mins according to your computer specifications to do it so have patience !!.

Step 5: Voila !! and your are Done. Later on if you want to restore Just open back the exported file again by double clicking it.

*You can also explore it by opening through a notepad .


Bypass Microsoft Windows 7 Password

Learn how to easily override the access to Windows XP or Windows 7 PCs, without knowing the password, by using a very simple trick.

Whether you have forgotten your own password, or you want to hack into another user account on Windows XP or Windows 7 PCs, here is a very easy trick or method, which does not require you to download any third-party utility or run complex commands. This is a very straightforward trick and the necessary requirements are already present with you. You may consider this method a security flaw in Windows, but there are ways that you can also block it before somebody else uses it to get into your PC.

However, if you do so, there are chances that you might not be able to use it yourself, if you get locked out of your own account. You might then need to use other resources (like Linux) to crack/reset your password. It is always advisable to enable the ‘Administrator’ account and set a password to it. In this way, you can get into the Administrator account and reset other user passwords.

Let’s get started

Windows, be it Windows XP, Windows Vista or Windows 7, has a built-in feature called ‘Sticky Keys’. This is an accessibility feature that was implemented to help people with certain types of physical disabilities and also to help reduce the strain of repetitive keystrokes. It helps serializing keystrokes, instead of pressing multiple keys at the same time. You can find out more from the system’s control panel. In this article, we shall show you how to take advantage of this feature in Windows and turn it into a password hacking option.

Step 1

The trick involves replacing the Sticky Keys control panel with the command prompt and then triggering the password reset commands from within the command prompt window. However, doing this is not as easy as said. Since the Sticky Keys cannot be easily renamed when the PC is logged in, we have to do it from the recovery mode.

In this workshop, Sticky Keys is not actually used to hack the password, but we shall make use of its features to pull up the command prompt in administrator mode and do the needful. We would need to pull up the command prompt before the PC is logged-in, in order to change the password. However, since the command prompt cannot be accessed during pre-login, the Sticky Keys option can be used here. Nevertheless, to get the necessary hack in place, we need to run a few commands. Let’s proceed ahead on how to do it.

bypass-windows

Step 2

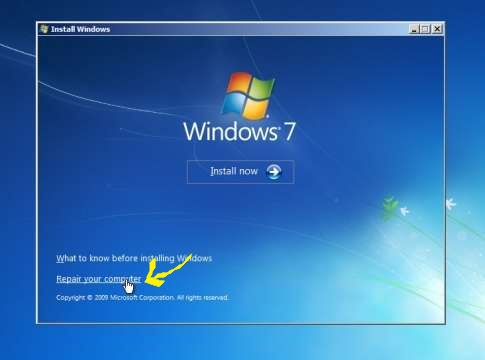
First, you need to boot your PC using your Windows installation DVD. Make sure you have your BIOS set to boot from the optical drive. Once you boot from the OS installation DVD, select the option to repair your computer. Windows will start loading the necessary files it needs and starts searching for problems that it can detect.

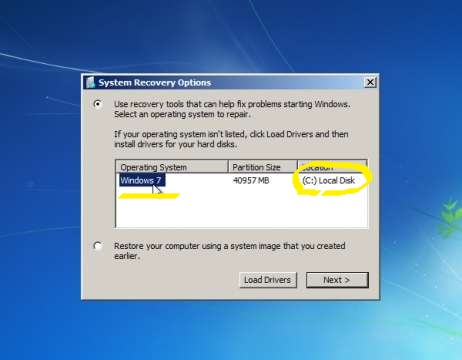
Note: This will take a bit of time depending on your computer’s speed. After a while, you will be asked to choose the location of the installed Windows OS on your hard drive. Choose the appropriate one and click on the ‘Next’ button. After the recovery mode checks for options, it will then will pop-up a window asking if you want to restore your system to an earlier point using the System Restore option. Decline the offer and press the cancel button.

hack windows 7

Step 3

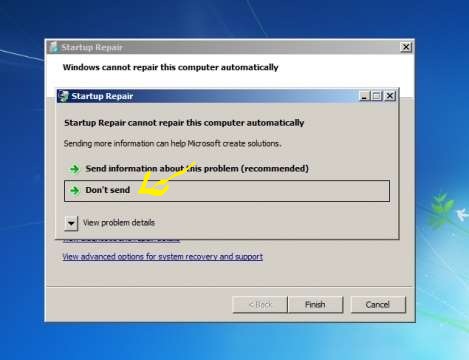
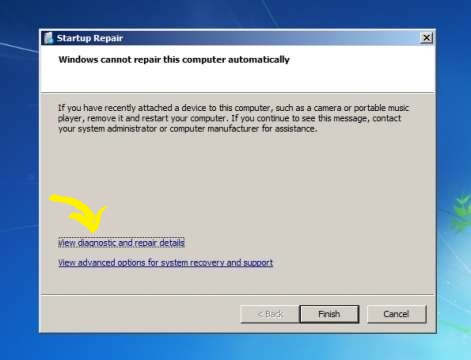
The next screen will state that Startup Repair cannot repair your computer automatically and ask you to choose to send the information report to Microsoft. This time once again, decline the option and click on ‘Don’t send’. The next window will ask you once more what it should do now.

hack windows


Click on the link which reads ‘View advanced options for system recovery and support’.


hack windows


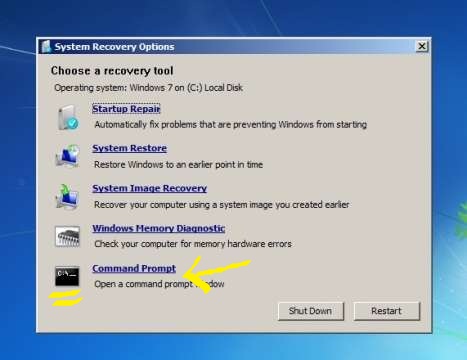
This link will take you to the options page where you should click on the ‘Command Prompt’ link.

hack windows

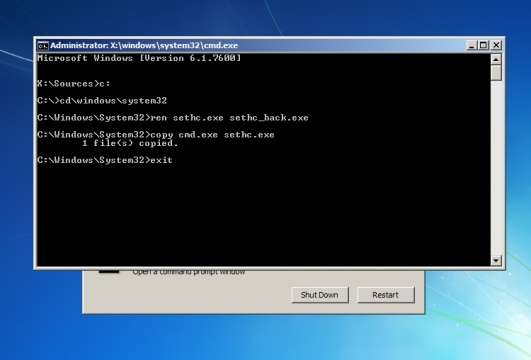
Once clicked, you will have the command prompt window where you should type the following commands as given below –

cmd commands

In this example we have taken C drive, you have to put that drive in which windows is installed.

Step 6


Now that you have finished with the necessary requirements to run the command prompt using the Sticky Keys function during the login period, you can restart the PC and boot the computer normally without the DVD. After the PC has booted into Windows, you will land on the login page, where you need to enter the password for the user. Assuming you have forgotten the password and need to reset it, here is what you have to do. Hit the ‘Shift’ key five times. The Sticky Keys will sense the shift key being pressed five times and will try pop-up the Sticky Keys utility. Click Yes.

 Step 7

However, since we have replaced the original Sticky Keys utility with the Command Prompt utility, you will see the Command Prompt window pop-up. This window will allow you to make any changes to the system using the default administrative privileges. Here, simply type the command to change the password of the user, which you have either forgotten or are trying to hack into. Type the command as follows:

  • net user <username> 123

here 123 is password.

Step 8

Once done, you can exit the command prompt window and login using the new password.

You can use this method to gain access to any user profile whenever you have forgotten the password. However, since it is a very simple method, you can run the risk of anyone gaining unauthorized access to your PC. If you feel this can cause a security issue or threat to your personal and important data, you can disable Sticky Keys permanently from the control panel.


Note: This workshop highlights a method of gaining access to a Windows PC and is for knowledge purposes. We urge you not to use this for any illegal purposes. Use this method at your own risk.