How to : Use Google Drive to Sync User Data in more than one PC

Google Drive is a great service no doubt, but simply installing the application, and synchronizing your files is just the first step. (The option for downloading and installing is available on the homepage of your online Google Drive at the bottom of the sidebar)

You can move your user data folders (Documents, Pictures, Music, Videos and Downloads) by right-clicking the folder and changing the destination path under ‘Location’ tab in the Properties menu.

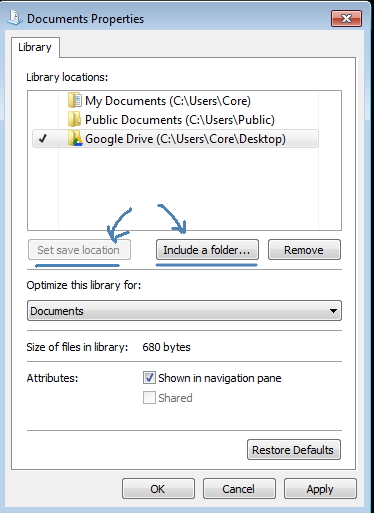
  • Windows 7 users need to go to the Explorer panel to the left, Expend the collapsible Library folder, and right-click the “My Documents” or similar folder to get the properties menu.
  • Click on “Include a Folder”, Browse to Google Drive Sync Folder. Select “Set Save location”.

document-properties

  • Change the location of one of these folders to your Google drive folder to synchronize it between computers. Do this on each computer you use and you’ll have the same files in your Documents, Downloads, and all other folders on all your computers.

Note: If the amount of data you have exceeds the storage capacity of Google Drive (that is, if the data if more than 5 GB), then the above method will fail to completely transfer all the files. Once the storage limit of Google Drive is reached, you will unable to add any more folders/files to it, and in this case, to your user data folders as well.

How to Restrict Hard Drives in Windows 7 for User Accounts

You can restrict access to a hard drive in Windows 7 for other user accounts in the same computer. This is useful if you have files on a hard drive that you do not want anyone else to access. Only specified user or Administrator will be able to access these. You can also change other settings, such as only allowing a user to view a file and not change it.

Steps to Follow :

  • Log on to your computer with an account with Administrator rights. Click “Start,” type “user” (without quotes) in the automatically selected “Search programs and files” search box and click “User Accounts.” Click “Manage another account.”


  • Click “Create a new account,” if you need to create a user account for other people that will be using the computer. If you already have another account set up, go to the next step. You need to have at least your user account and another one set up to restrict access to a drive. Type a name for the user and click “Create Account.”

  • Click “Start” and “Computer.” Right-click the name of the hard drive you want to restrict access to. Click “Properties.”

  • Click the “Security tab” in the “Properties” window that opened. Click “Edit…” and “Add…” in the “Select Users or Groups” window that opened.
Restrict-Hard-Drives-in-Windows-7-1
  • Type the name of the other user account on your computer or you can click “Advanced” and then “Find Now”, then select your user account. Click “OK.” Uncheck the boxes to the left of any options that you do not want the user to have available. Check the “Deny” box for “Full control” to disable all control from the user for files on the hard drive.
Restrict-Hard-Drives-in-Windows-7
  • Click “OK,” “Yes” and “OK.” Close any open windows. Click “Start,” log off of your account and log on as the other user to test your settings.

  • Click “Start,” “Computer” and double-click the name of the hard drive you restricted access to. A window indicating that “Access is denied” is shown. Close the window and log off the computer.

And you are done.