A Mac is built for compatibility, supporting all industry standards; Mac OS X is almost fully compatible to windows. For those for whom even this isn’t enough, there is Boot Camp. Boot Camp is a utility included in Mac OS X 10.5 Leopard onwards that allows you to dual boot Microsoft Windows with Mac OS X. It guides you through easy re-partitioning for windows, assists you by installing a boot loader so that you can choose the OS to boot into at the time of startup, and adds a Boot Camp control to the Microsoft windows control panel so that these settings can be modified from there also.
Here is how to go about dual booting Windows on your Mac. Go to Application/Utilities from your task bar and run the Boot Camp Assistant over there. It is a simple wizard like interface that takes you through the following processes.
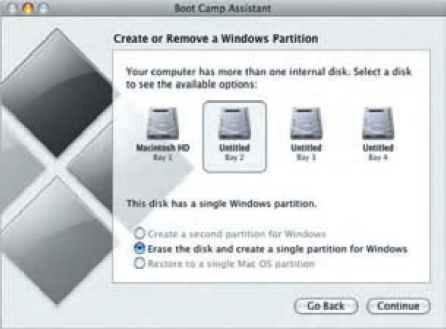
1. Creating a partition on your hard disk for Windows: Allowing for nondestructive re-partitioning of your hard disk (without losing any data), this menu comes with three options, you can choose to use a 32 GB partition for Windows, split the hard disk 50-50 between Windows and Mac OS, or manually choose a size. When manually choosing a size, remember to make the Windows partition at least 5 GB in size, while the partition with Mac OS currently installed in it should at least have 5 GB left free. If you have multiple internal hard disks, it is advisable to keep your Windows partition on a different disk.
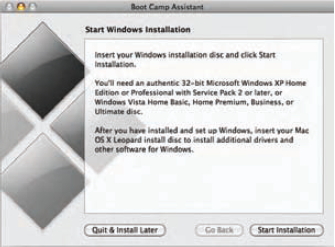
2. Start Installing Windows: Once partitioning is done, you will be back to the main Boot Camp menu, from where you have to select “Start the Windows Installer”. Follow the menu until you are asked to insert your Windows disk. Soon your computer will restart and boot from the Windows DVD.
(Note that if you are attempting to install Windows XP, it has to be SP2. You cannot install a basic Windows XP and attempt to upgrade to SP2 later.)
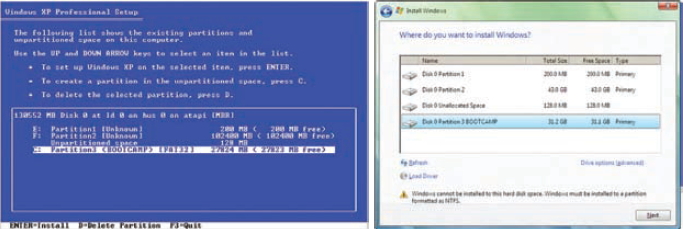
3. Choosing your partition: Follow the simple on screen instructions until you arrive at the choose partition menu.
You need to be careful doing this step. Select only the partition labeled – Partition* <BOOTCAMP> (where * is a number such as 1,2,3). Only one partition will have a name in that format. Choosing any other partition might wipe out your Mac OSX along with all your data from your computer. If you are installing Windows 7, the partition will appear as Disk * Partition * BOOTCAMP.
4. Formatting your Partition: Now you will be asked if you want this drive to be FAT or NTFS, i.e. to choose its file system. Windows 7 requires NTFS, so it will by default format your partition as NTFS without asking you. Also if the partition is 32 GB or more in size, it has to be NTFS. However, if the disk is made NTFS, it will be read only (you cannot modify files or write new ones) while running Mac OS X. So make your choice wisely.
5. Installing Drivers: Your Mac OS X CD that came with your Mac also contains windows drivers and Boot Camp components to ensure flawless functioning of windows on your system. To install these drivers, once you are logged into Windows, (after the whole installation process is over), insert he Mac OS X DVD. If auto run is disabled, you will have to open the drive in my computer and run setup.exe manually for drivers.
Otherwise, it will start automatically. The setup will install drivers for all your built in Mac components. However, some external add on peripherals such as external iSight webcams might not be supported this way. You are advised to go to the Apple web site for these drivers. Your computer might need to restart few times.
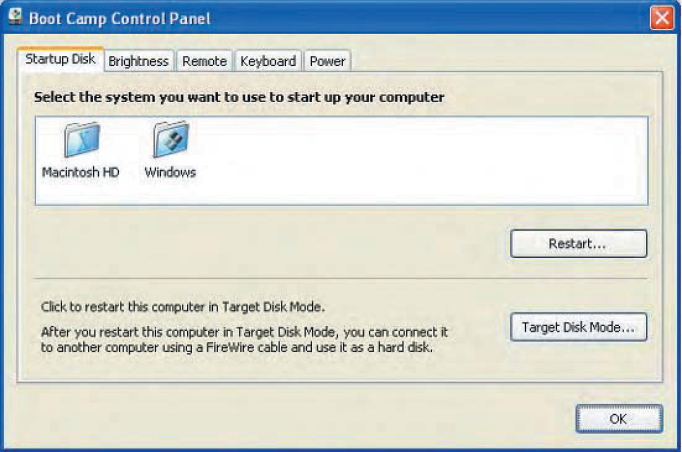
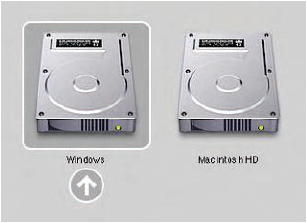
6. Setting up your default start up: Thanks to the Boot Camp control panel installed in your Windows control panel, this can be done from both Windows and Mac OS X. In Mac, go to System Preferences > start up disk (found either on the dock or using finder). In the menu that shows up, you can choose your default operating system. In Windows, this can be done using Control Panel > Boot Camp Control Panel. This menu also offers you the unique feature of using your computer as a target disk. To do this, select the disk of choice, Windows or Mac OS X and click target disk mode.
Once your computer restarts, you may use its fire wire port to connect it to any other computer and use it as an external hard disk. This may be done in extreme cases for data recovery or restoration.
You can also quickly boot into Mac OS X while using windows by right clicking the Boot Camp system tray icon and choosing restart in Mac OS X.
An alternative is Vmware Fusion. It also has many of the popular features such as support for Boot Camp. However, many of the seamless virtualization features such as coherence are missing.
Note: Before installing Boot Camp, always back up important data. “Precaution is better than cure.”