How to: Add custom icon on Removable Drive

Did You Notice, whenever you insert a game CD/DVD, an icon is used over the drive. By default windows will put a simple Disk image over it. Game developers and software designers generally use their company logo to show off some style.

You can also do this simply to your Removable Drive (Pen Drive, CD and DVD). Most of the people must have seen an “autorun.inf” file inside CD/DVDs. This file is responsible for automatically executing application or start setup when the disk is inserted. This file is also capable of adding custom icon to it. For this:

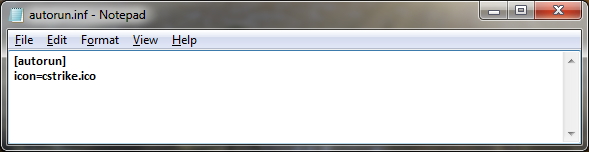
1) Open Microsoft Notepad or any other text editor.

2) Write the following code in it:

[autorun]
ICON=your_icon_name.ico

3) Now save it but not with a .txt file extension, name it as “autorun.inf”. Make sure you set extension right.

autorun

4) Simply copy this file and icon file to root of your Removable Drive.

Explore-drive

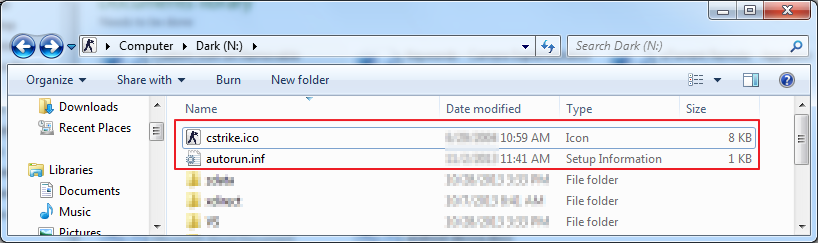
Remember! The “your_icon_name” MUST be replaced with the name of icon file. You can use icons embedded in a *.dll file by placing the dll file under the icon tag, and then index it.

Eg: icon=”shell32.dll, 5”

Bitmap (*.bmp) files are also supported for this action (but not recommended). There are some other tags that can be used other than icon in autorun.inf file, like: label, open, action. We will discuss rest in some other articles.

How to : Use Google Drive to Sync User Data in more than one PC

Google Drive is a great service no doubt, but simply installing the application, and synchronizing your files is just the first step. (The option for downloading and installing is available on the homepage of your online Google Drive at the bottom of the sidebar)

You can move your user data folders (Documents, Pictures, Music, Videos and Downloads) by right-clicking the folder and changing the destination path under ‘Location’ tab in the Properties menu.

  • Windows 7 users need to go to the Explorer panel to the left, Expend the collapsible Library folder, and right-click the “My Documents” or similar folder to get the properties menu.
  • Click on “Include a Folder”, Browse to Google Drive Sync Folder. Select “Set Save location”.

document-properties

  • Change the location of one of these folders to your Google drive folder to synchronize it between computers. Do this on each computer you use and you’ll have the same files in your Documents, Downloads, and all other folders on all your computers.

Note: If the amount of data you have exceeds the storage capacity of Google Drive (that is, if the data if more than 5 GB), then the above method will fail to completely transfer all the files. Once the storage limit of Google Drive is reached, you will unable to add any more folders/files to it, and in this case, to your user data folders as well.

Howto : Use USB Drive as a Hardware key for computer

Windows has an inbuilt system utility called SysKey that can help you use a normal pen drive as an access device instead of a regular text based password. To do this

  • First step is to assign A: as your removable disk drive. This is because the utility was designed to work with floppy drives.

change-drive-letter

  • To do this hit [Window] key and type “disk management” and press enter. Right click the relevant drive name of USB and change drive letter.
  • Now hit the [Window] key again and type Syskey and press Enter.

syskey-store-usb

  • Click update –> Store key on Floppy Disk. Click OK

After this a file called Startkey.key will be created on your pendrive and your PC won’t boot into your desktop unless the pen-drive is plugged into your system.

To revert back , just follow above procedure again and set STORE STARTUP KEY LOCALLY.

How to block access of USB

USB access is something that can affect your computer in a variety of ways. Whether you’re protecting your computer against viruses or malware, or you don’t want anybody to have the ability to copy files onto a USB memory stick, you will need to restrict the access to the USB ports on your system. Setting this up will give your computer the security it needs and keep your data safe.

  • Click “Start” and select “Run.”
  • Type “regedit” into the box and press “Enter.”
  • Look for “HKEY_LOCAL_MACHINE\SYSTEM\CurrentControlSet\Services\UsbStor.”
usb-block
  • Select the “USBSTOR” entry.
  • Right-click on the “Start” file on the right and select “Modify.” Change the value to “4” to deny access to the USB ports.
  • To enable it , just turn back value  to “3”.

You can speedup the process by creating desktop shortcut of this procedure. Learn from here: Create shortcut to modify registry files

Note: You need administrator privileges for this.

Daemon tools Lite

DAEMON Tools Lite is a virtual DVD-ROM emulator based on a SCSI miniport driver. It emulates max. 4 DVD-ROM drives and works with CD/DVD images created by many burning programs.
It’s a real pain–not to mention slow–to continually swap CDs and DVDs out of your optical drive. It can take up to half a minute for your drive and Windows to mount a disc. Gamers who must leave a copy-protected disc in the drive in order to play a game are especially affected. Hence pay products that emulate a CD/DVD drive and allow you to mount disc images (files containing all the information from a disc) to a virtual drive. Fortunately for those on a budget, there’s a free alternative: Daemon Tools Lite.

daemon-tools

The first thing you’ll notice about either Daemon Tools Pro version is that there’s a straightforward, easy-to-use GUI–no command line visits for advanced features as there are with Lite. Both Pro Standard and Advanced also support more virtual devices: 16 and 32 drives respectively, and Advanced offers 2 virtual IDE devices in addition to the Lite and Standard version’s SCSI devices. Both Pro versions also let you mount the contents of an optical disc to an NTFS folder (instead of a drive) as well as letting you edit images (add, delete files, etc.).

Both the Standard and Advanced versions of Daemon Tools Pro offer cataloging and creation of image files, but Advanced takes things one step further with conversion between various image types. All versions support a number of file formats: plain and compressed ISO files and media descriptor (MDS), for starters, as well as the formats belonging to Blindwrite, Blindread, Nero, CloneCD, DiskJuggler, and InstantCD/DVD images.

Daemon Tools Lite is easy to use. We clicked Add Image, browsed to some ISO images, and added them to the Image Catalog. Then it was a simple matter of selecting drive and image and clicking the Mount arrow. We were able to access our new drive normally in Explorer. Daemon Tools Lite is a great choice for laptops, especially those that lack optical drives. But anyone who uses DVDs or CDs for data or pleasure can save time and power by using virtual disc drives instead of spinning plastic.

The only real negative to Daemon Tools Pro is that neither the Advanced nor the Standard versions (nor the free Lite, of course) handle copy-protected discs.

If you spend a lot of time swapping and hence waiting on CDs or DVDs to mount, Daemon Tools Lite is worth its weight in gold. Even if you don’t, it’s a program you should download to keep in your bag of tricks–you’ll find a use for it eventually.

How to Encrypt Your Pen Drive

Encrytion on Various Platforms

Encrytion on Windows

There are a variety of Windows-based tools for creating an encrypted volume on a USB stick, but our favorite is the free, open-source FreeOTFE. FreeOTFE uses on-the-fly encryption, which means that data is automatically encrypted and decrypted without you needing to do anything other than enter a password or possess the right keyfile.

To get started, download and install FreeOTFE. Then open the application and select your USB cick on the “New” icon. FreeOTFE will then walk you through the process of setting up your encrypted volume and help you choose an encryption algorithm or set other options.

Once FreeOTFE finishes, your USB stick will contain an encrypted volume where you can store sensative data to keep it safe from prying eyes.

True Crypt

An alternative system is TrueCrypt, although unlike FreeOTFE, this requires you to have administrator rights to even start it on any computer you wish to use your encrypted thumb drive on.

Encryption on Mac OS X

Mac OS X actually has a nice built-in encryption tool you can use right out of the box.

To get started, just plug in your USB stick and open up Disk Utility (you’ll find it in the Utilities folder inside your Applications folder).

In Disk Utility head to File >> New >> Blank Disk Image. Select your USB stick as the destination and choose one of the encryption options. You can also set the size of the volume, number of partitions and the format.

Once that’s done click create and enter a good password .

Alternativly, there is a Mac version of TrueCrypt which may be used.

Cross-Platform Encryption

For accessing data across MS Windows and Windows Mobile PDAs, the previously mentioned FreeOTFEserves as a solid open-source cross-platform option.

For use with Windows, Linux and Mac OS X machines, TrueCrypt can also be used.