uTorrent Remote: Control torrent remotely

uTorrent is a pretty popular BitTorrent client for computers. With the remote app, you can control the activity of your file sharing on the move. You can check progress of your current downloads, stop or resume them. You can even add new downloads remotely. This is ease the pain of accessing target machine again and again.

What is uTorrent Remote?

According to uTorrent.com, “μTorrent (uTorrent) Remote is a remote control that lets you access μTorrent running on your home computer– from anywhere on the internet, including most mobile phones and tablets.”

screenshot-2screenshot-1

So how it is done?

First of all, you need to open Preferences in uTorrent on target machine, click on ‘Remote‘, and enable remote access by checking “Enable uTorrent Remote Access”. Give your computer a name and associated password and you’re ready to go. Now put these credentials in uTorrent Remote app to start using in Real Time!

preferences-utorrent-remote

Unfortunately, there isn’t an app for iOS but they have a mobile-friendly website which can let iPhone and iPad users have the same functionality as the apps for other platforms. You can even create a shortcut on your home screen by opening the page in Safari and clicking the “Add to home screen” button in the Share menu. Link for remote uTorrent can be found here: https://remote.utorrent.com.

The uTorrent Remote interface is very user friendly and how it works will be clear to anyone who uses uTorrent. It’s not quite as polished as the desktop apps, but it is almost as complete, letting you do pretty much anything you can do on your computer. Just remember that to use it, your computer needs to be on and uTorrent needs to be running.

Price: Free

Platforms: Android, Windows

Play Store link: https://play.google.com/store/apps/details?id=com.utorrent.web&hl=en

How to: Install Windows on Mac via Boot Camp

A Mac is built for compatibility, supporting all industry standards; Mac OS X is almost fully compatible to windows. For those for whom even this isn’t enough, there is Boot Camp. Boot Camp is a utility included in Mac OS X 10.5 Leopard onwards that allows you to dual boot Microsoft Windows with Mac OS X. It guides you through easy re-partitioning for windows, assists you by installing a boot loader so that you can choose the OS to boot into at the time of startup, and adds a Boot Camp control to the Microsoft windows control panel so that these settings can be modified from there also.

Here is how to go about dual booting Windows on your Mac. Go to Application/Utilities from your task bar and run the Boot Camp Assistant over there. It is a simple wizard like interface that takes you through the following processes.

bootcamp-install

1. Creating a partition on your hard disk for Windows: Allowing for nondestructive re-partitioning of your hard disk (without losing any data), this menu comes with three options, you can choose to use a 32 GB partition for Windows, split the hard disk 50-50 between Windows and Mac OS, or manually choose a size. When manually choosing a size, remember to make the Windows partition at least 5 GB in size, while the partition with Mac OS currently installed in it should at least have 5 GB left free. If you have multiple internal hard disks, it is advisable to keep your Windows partition on a different disk.

bootcamp-partition

2. Start Installing Windows: Once partitioning is done, you will be back to the main Boot Camp menu, from where you have to select “Start the Windows Installer”. Follow the menu until you are asked to insert your Windows disk. Soon your computer will restart and boot from the Windows DVD.

(Note that if you are attempting to install Windows XP, it has to be SP2. You cannot install a basic Windows XP and attempt to upgrade to SP2 later.)

bootcamp-win-format

3. Choosing your partition: Follow the simple on screen instructions until you arrive at the choose partition menu.

You need to be careful doing this step. Select only the partition labeled – Partition* <BOOTCAMP> (where * is a number such as 1,2,3). Only one partition will have a name in that format. Choosing any other partition might wipe out your Mac OSX along with all your data from your computer. If you are installing Windows 7, the partition will appear as Disk * Partition * BOOTCAMP.


4. Formatting your Partition: Now you will be asked if you want this drive to be FAT or NTFS, i.e. to choose its file system. Windows 7 requires NTFS, so it will by default format your partition as NTFS without asking you. Also if the partition is 32 GB or more in size, it has to be NTFS. However, if the disk is made NTFS, it will be read only (you cannot modify files or write new ones) while running Mac OS X. So make your choice wisely.


5. Installing Drivers: Your Mac OS X CD that came with your Mac also contains windows drivers and Boot Camp components to ensure flawless functioning of windows on your system. To install these drivers, once you are logged into Windows, (after the whole installation process is over), insert he Mac OS X DVD. If auto run is disabled, you will have to open the drive in my computer and run setup.exe manually for drivers.


bootcamp-startup

Otherwise, it will start automatically. The setup will install drivers for all your built in Mac components. However, some external add on peripherals such as external iSight webcams might not be supported this way. You are advised to go to the Apple web site for these drivers. Your computer might need to restart few times.

bootcamp-controlpanel

6. Setting up your default start up: Thanks to the Boot Camp control panel installed in your Windows control panel, this can be done from both Windows and Mac OS X. In Mac, go to System Preferences > start up disk (found either on the dock or using finder). In the menu that shows up, you can choose your default operating system. In Windows, this can be done using Control Panel > Boot Camp Control Panel. This menu also offers you the unique feature of using your computer as a target disk. To do this, select the disk of choice, Windows or Mac OS X and click target disk mode.

Once your computer restarts, you may use its fire wire port to connect it to any other computer and use it as an external hard disk. This may be done in extreme cases for data recovery or restoration.

You can also quickly boot into Mac OS X while using windows by right clicking the Boot Camp system tray icon and choosing restart in Mac OS X.

An alternative is Vmware Fusion. It also has many of the popular features such as support for Boot Camp. However, many of the seamless virtualization features such as coherence are missing.


Note: Before installing Boot Camp, always back up important data. “Precaution is better than cure.”


How to check if two PCs are connected in a network

So you are trying to establish a network between two computers and you have no idea whether they are setup correctly. To check if the connection is able to send and receive data, windows have a inbuilt service through which we can check the connectivity by sending and receiving some bytes of data from your pc to target computer.

If you have wired them through switch or router, you should always first check the LED on  Ethernet port. That LED should be blinking in most of the cases but if it’s not then you might have not connected them properly.

Follow these simple steps to check even if they are connected wirelessly:

1)      Get the IP of target machine.

2)      Open Command Prompt, by hitting (Windows+R) key and then typing cmd. Windows key is placed besides ALT key or you can go to Start > All Programs > Accessories > Command Prompt.

no-connection

Request timed out because of connection errors.

3)      Once the Command prompt is open, type “ping <ip address of target machine>”. For example :

ping 192.168.1.3
connected

Connected successfully! For the sake of example i am pinging to my myself.

It will start sending some packets to the machine , if the response is received it means your connection is working fine. But if request timed out then there might be some problem.

Google Chromecast review

This is an interesting little device that should be high on your gadget gifts list as it effectively connects your smartphone, tablet, laptop or desktop PC to an HDMI enabled HDTV – without connecting wires, too. The Chromecast seamlessly lets you beam content from your handheld smart device onto your big-screen TV – watch YouTube videos, Netflix, Google Music, Google TV and Movies. When you’re doing this, your phone or tablet becomes the TV remote. Its beta screen mirroring feature – which lets you beam your Chrome browser session to a large screen – is still restrictive, but it’s only a matter of time before Google keeps adding more apps to the Chromecast party.

Design

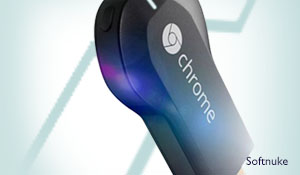
The whole thing is a little under 3 inches long, and it’ll stick out about 2.5 inches when plugged into an HDMI port. There’s a short HDMI extension cable in the box to provide extra clearance if you can’t fit the Chromecast against the back of your TV, but you might need something longer depending on your setup, as the extension really just makes everything stick out more.

Chromecast is so small it could easily be mistaken for an oversized USB thumb drive with a little more heft to it. That contrasts with Apple TV and the “buddy boxes” that run Google TV. These devices that are filled with more audio and video ports than users know what to do with: component, S/PDIF, Ethernet, multiple HDMI connections, you name it.

Chromecast doesn’t have an HDMI port, it just fits right into one.

Setup

The setup can be remarkably easy if you follow Google’s directions and download the setup app on your computer or mobile device. On the back there’s an LED, a button, and a Micro USB port, which is how the Chromecast gets power. Yes, power — Google actually recommends that you use the included external power adapter to plug the Chromecast into the wall. Once you’ve got the Chromecast plugged in and powered, the next step is getting it on your Wi-Fi network.

The Chromecast is basically a small Android computer that can connect to the internet and play video files. When you hit the Cast button in a supported app, the Chromecast directly connects to the internet and streams the video itself — it’s not streaming from your device.

Since there’s no single, definitive place to control the Chromecast, it’s easy to find yourself watching a video without any immediate way to pause, rewind, or mute — you have to remember where the video came from and open that app. It’s not a big problem, but it’s added complexity. Google really needs to add basic playback controls like play, pause, and mute to the Chromecast setup app. Google also desperately needs to add in some basic password controls; right now anyone walking by can grab control of your Chromecast and send video to it. That makes it super easy to use, but also opens up a world of elaborate trolling.

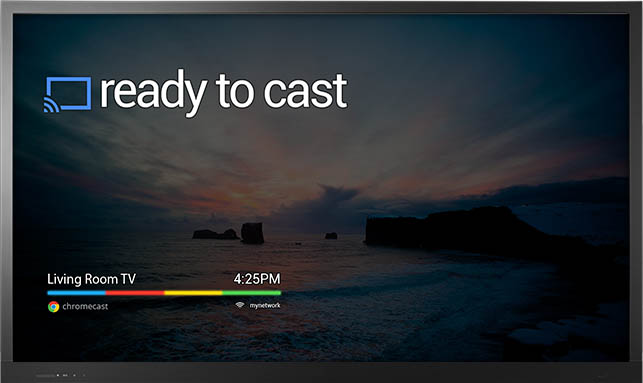
You can set up multiple Chromecasts on the same Wi-Fi network, and the setup app even lets you rename them, so you can label each HDTV and room. By default they’re called “ChromecastXXXX” (with different four-digit numbers to identify them), but you can easily change them to “Living Room” and “Bedroom.”

Digging

There’s a “cast” button that is uniformly built into the top right of all of the compatible mobile apps: YouTube, Netflix, Google Play Music, and Google Play Movies & TV. The same goes for the Chrome browser extension on computers, but not Chrome on mobile devices, which have been left out of the media extending picture.

Pressing “cast” causes the Chromecast to start pulling an app’s video and audio to the TV on its own. This conveniently frees up your computer, phone, and tablet to fine-tune the streaming content’s timeline, audio settings, or make other selections within the app.

Chromecast can act as a second screen in a couple of cases, letting you browse the internet or do something else on the computer while a tab with your Gmail, Twitter feed or a video is running in a “casted” background on the big screen.

But don’t make a mistake thinking that this can be a dedicated second screen option for work; it’s just an extra screen to watch.

The Chromecast tab extension is also limited to Chrome at the moment and may never work outside of the Google-owned browser. That means FireFox, Internet Explorer, Safari and Opera users are out of luck if they had hoped to “cast” using their favorite browser. If Google opens up the Chromecast API, that could change in the future instead of forcing everyone to use Chrome for this one reason.

ready-to-cast

Downside

The Chromecast’s biggest limitation, of course, is content. Right now, the system only supports video from YouTube, Netflix, and Google Play Music & Movies on mobile. Having only rarely used Google Play’s VOD service and owning a variety of other devices with which to watch YouTube and Netflix, the novelty of the Chromecast’s app streaming functionality wore off quick. But Google promises more apps are on the way, and given the company’s clout, I’m inclined to believe them.

Though generally painless, there are scenarios when the Chromecast can be challenging to configure. For instance, if your TV is somewhat far or a few rooms away from your router, the Chromecast can struggle to maintain a connection.

Wrap-up

I can say that it has easily become my favorite way to watch Netflix and YouTube, which makes up a big part of my TV viewing these days. But Netflix and YouTube are clearly just the beginning for Chromecast. Hulu, Vimeo, HBO Go and others have already pledged their support, and a small army of independent developers has started to hack away and bring their own apps and games to the device. All of this means that Chromecast will get substantially better over the coming months.

Bad Stuff :

  • Not enough apps yet, Windows Phone not supported
  • Mirroring limited to browser tab
  • Weak Wi-Fi range
  • Chrome is the only supported browser

Good Stuff:

  • Streams Android to a big TV
  • Works with iOS, Macs and PCs
  • Easy to setup and transport
  • Cheapest media adapter
  • Supports multiple Chromecasts on the same network.