Technology Gadgets Made Out of LEGO Bricks

Technology is all about creating advancements in any subject.  The fact that people can create these devices out of LEGO parts is even more amazing.  This means that this popular building toy is being used as a real-world modeling tool.

Potentially everyone has the opportunity to become an inventor.  The best part is that you don’t have to work out some of the more tedious aspects of designing.  The base materials that are found in LEGO bricks have worked out things like precise measurements and the ability to make a consistent model.

It is one thing to make something that works.  However, it is ten times more useful to be able to duplicate the gadget with ease.  The following builders all are pushing the envelope of what’s possible.

Legotrope

horse-zoetrope

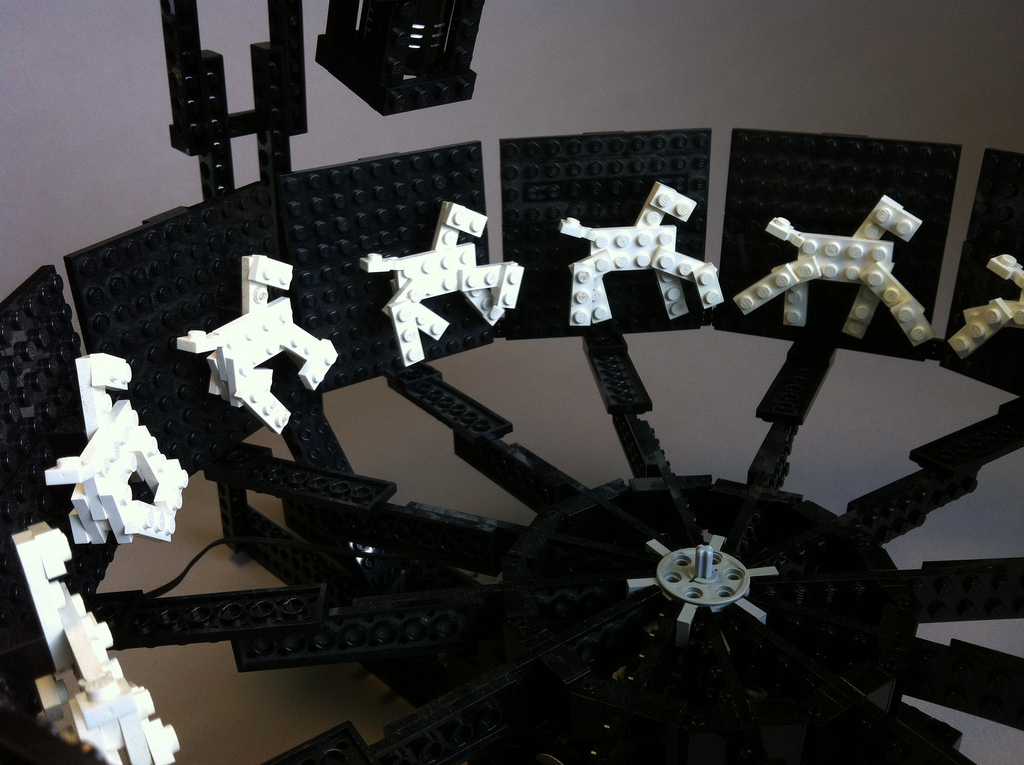
The beginning of moving pictures started with things like the zoetrope.  Chad Mealey wanted to see if this technology could be applied to a LEGO creation.  The concept is that a number of frames are shown in quick succession.  This tricks the human eye into thinking that you are seeing movement.  Chad based his twelve frame motorized version on the Muybridge photos of a running horse.

Ludwig Piano

Ludwig-Piano-back

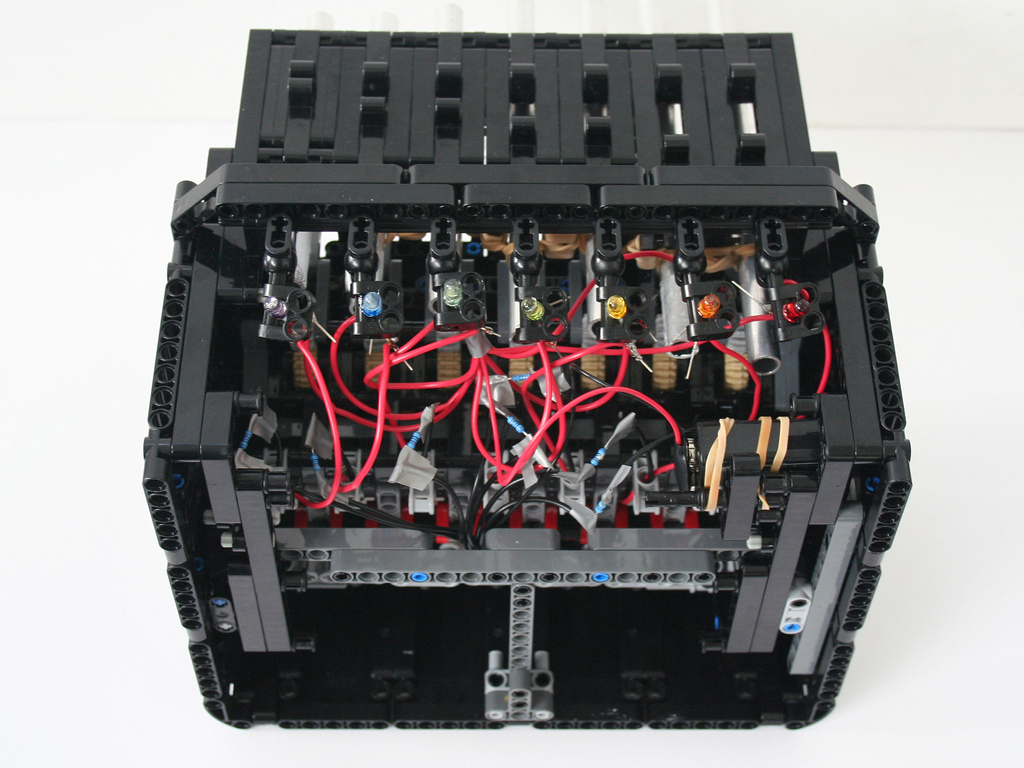
Normally music is for those with the ability to hear.  However, there is a concept known as induced synesthesia that attempts to engage other senses to enable the experience of music by the hearing impaired.  Vimal Patel has developed a LEGO piano that displays lights along with the sound.  This increased form of stimulus is meant to expand people’s enjoyment when played.

LEGO Mill NXT

3D-printer

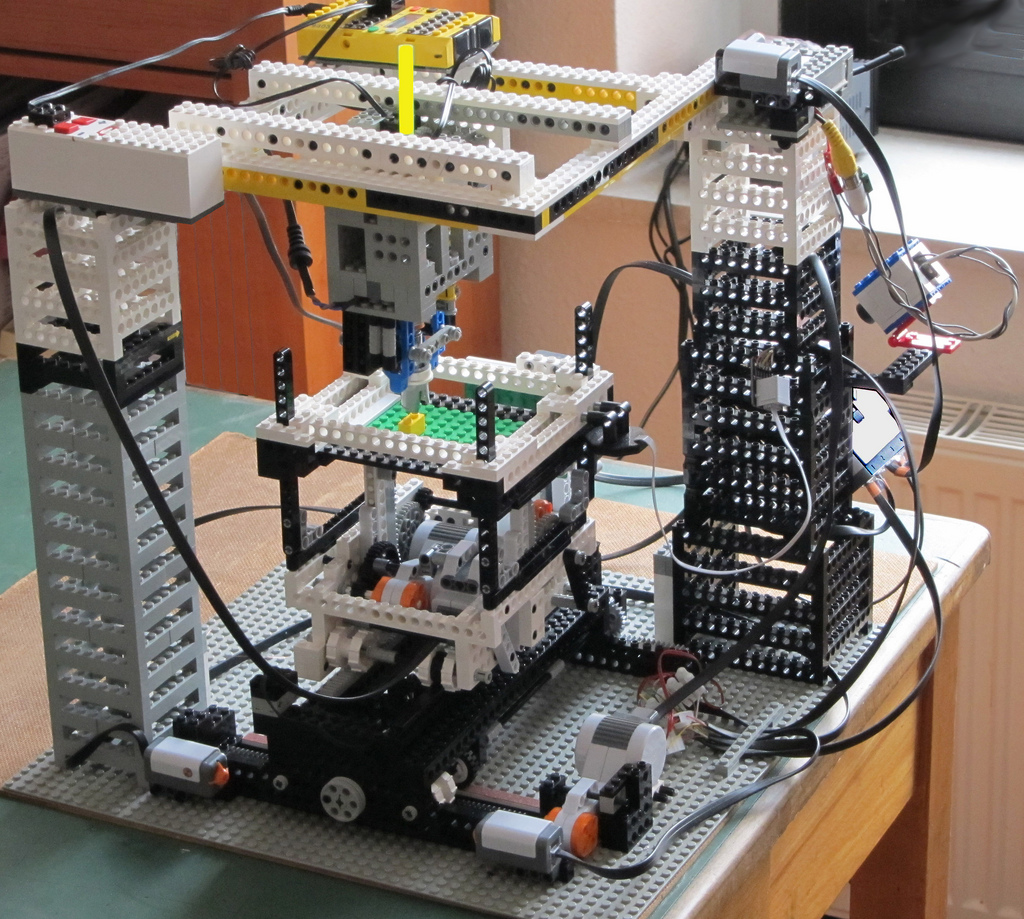
Not many would think to make a device that could in turn make more pieces to build with.  Jan Holthusen is not most people.  His creation is a 3-D printer that can make objects.  To do this, it requires a pliable material to work with.  In this case, hot glue is melted and then ejected for the printing process.  With this gadget, Jan has the capability to make some unique designs.  Granted, they’d be made out of hot glue, but the end result is astounding.

LEGO Printer

lego-printer

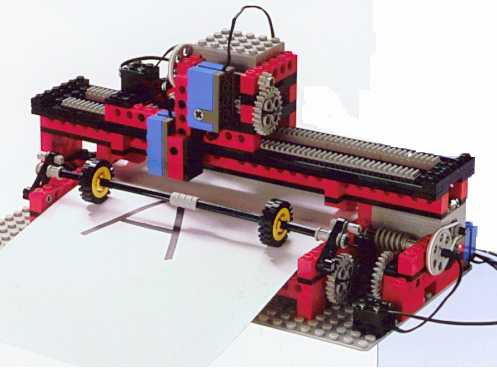
Not everyone has the need for a 3-D model.  You are more likely to print something out on paper.  Danilowille uses the various robotic options from LEGO Mindstorms to create a LEGO printer.  Practically the only thing not made from LEGO bricks is the pen and paper it uses to write with.

LEGO Ball Clock

ball-clock

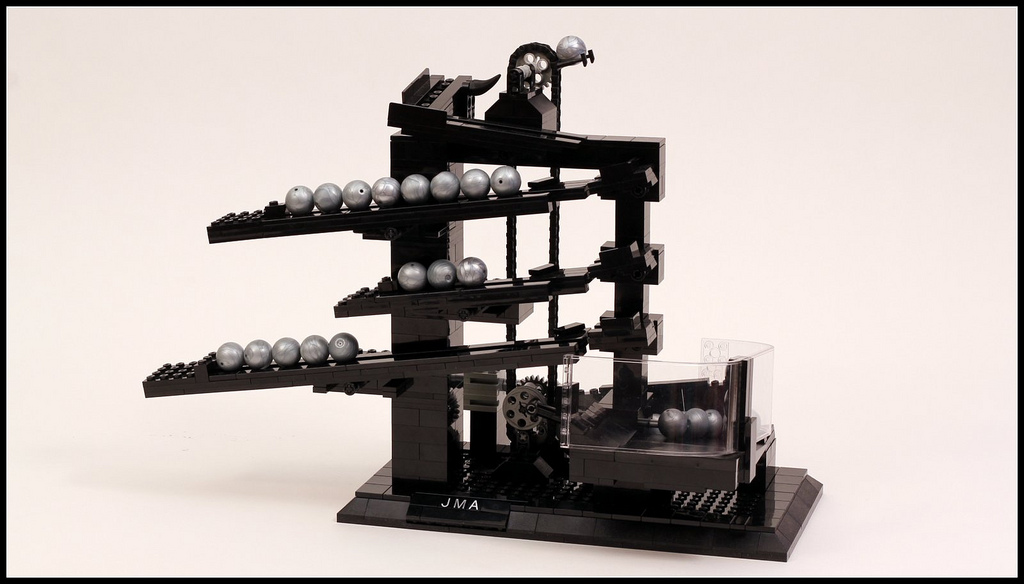
Many people are familiar with the various ball contraptions fans have made with LEGO bricks.  This is a slight variation of that process.  JK Brickworks has created a specific type of clock he had as a child.  The clock features three rows.  Depending on where balls are on each row will tell you what time it is.  The bottom row is hours, the middle row is ten minutes, and the top row is single minutes.  As a row fills up, it deposits a ball into the row below before emptying into the reservoir, thus giving you the time in a quasi digital fashion.


Author
Carlo Pandian is an adult fan of LEGO and freelance writer, and his dream is to become a Master Model Builder at LEGOLAND Discovery Center Boston. When he’s not online, Carlo loves to learn new things such as Arduino and DIY design.

Credits
Legotrope No 3 Horses
 Ludwig Piano
 LEGO Mill NXT
 Lego printer
 LEGO Ball Clock

DIY : Create Self-Destruct Messages with Google Docs in Mission Impossible Style

It’s a clever technology, as well as a manifestation of an interesting argument that some legal and internet scholars have begun to make: All information should have an expiration date.  This means, once they read the message they will no longer be able to read it again after the timer has reached zero. This ensures your message is read by no one but the reader and all evidence of the message is erased.

You can send passwords and other private information as self-destructing messages in Google Docs that will vanish after being read.Would you like to send a confidential note to a friend that self-destructs after it has been read so that no one else (including your friend) can ever see that secret note again?

There are web apps – like OneShar.es and Burn Note – that offer an easy solution. They essentially create a temporary web page/link that auto-expires after it has been viewed once.

Alternatively, you can even use Google Docs to send self-destructing messages to anyone through Google Apps Script.

Creating Messages in Google Docs

This message will self-destruct in ten seconds. It takes a minute to convert a Google Docs sheet into a self-destructing one. Just follow this :

  • Open your Google Docs account and create new spreadsheet.

self-destruct-google-docs

  •  Input your data that you will be sharing with your friend. Then go to Tools > Script Manager, a new tab will be popped.

self-destruct-google-docs-script-manager

  • Select Blank Project in the title menu. An editor will be available in your browser, copy-paste Script to this editor from below this page and save it.

self-destruct-google-docs-script

  • Don’t forget to change value of time variable according to your need (seconds to wait before cleanup). Hit Save icon.
  • Now close Script editor window, Open again script manager by going to Tools or hit Reload if it is already opened. You will find your script listed there.
  • Lastly, Click on Share button available in top-right corner of the screen. Change Access from CAN VIEW to CAN EDIT. Then Share it.

self-destruct-google-docs-sharingMake sure the permission is set to “Can Edit” in the sharing window.

Your friend opens the sheet, reads the message and after 10 seconds, the entire sheet on his screen will clear itself. If you wish to send another self-destructing message, create a copy of the original sheet and repeat the steps.

How does it work?

The trick is simple. We have an onOpen trigger attached to the Google sheet that becomes active as soon as the sheet is opened. This trigger waits for 10 seconds (Utilities.sleep) and then runs the clear() command to empty all the cells of the sheet.

Here’s the Google Apps Script code that actually makes your “secret message” vanish.

function onOpen() {

var time = 10; /* Wait Time (in seconds) */

var ss = SpreadsheetApp.getActiveSpreadsheet(); ss.toast(“This message will disappear after ” + time + ” seconds. So read fast !!!”);

Utilities.sleep(time*1000); ss.toast(“We are now sending this private note to the shredder. Bye :)”);

ss.getActiveSheet() .getRange(1, 1, ss.getLastRow(), ss.getLastColumn()).clear(); }

Steganography – Hide your data in images

If there’s one thing that history and popular culture has taught us about spies and secrets, it’s that often, the best hiding spot is the one in plain sight. After all, if an intruder is searching for valuable information, surely the last place he would check is right under his own nose, right?

A Little Get to Know

Steganography

This logic forms the basis for steganography, itself an ancient historical practice of concealing information within images. This practice differs greatly in purpose from cryptography. The latter employs code to hide a message, this appears as jumbled letters and numbers, unless a cipher(or key) was used to decrypt the information back into its readable state. However, while cryptography is a great for sending messages securely across unsafe channels, the very nature of the encrypted message will tip-off anyone is its true form. In short, just because its hard to break into, doesn’t mean you want to leave it in plain sight. What if sending encrypting messages itself is against the law?

This is where steganography comes in. Using basic freeware tools like OpenPuff, It is possible to hide audio files, videos, messages and images within a file (usually an image).

Now comes the Action : Hide

You can download OpenPuff from here. After downloading and installing OpenPuff you’ll see two primary options for steganography: Hide and Unhide.

openpuff-title

Select Hide, and you will be taken to a menu divided into four steps.

  • The first step entails entering up to three different passwords to secure your data. You can choose to enter only one password as well, if keeping up with them all becomes tough.
  • Then you will have to select your target file that you’ll be transferring.Use the Browse button, and select the target to see its overall size in a bar below the name.
  • In this third step, you will have to choose a carrier. Keep in mind that the carrier can’t be smaller that the target (it may become suspicious).

openpuff-hide

You can attach multiple carrier bits if one file isn’t big enough. Hit the Add Button to navigate to files designated as the carrier space is greater, the red status bar will turn green.

The Bit Selection Option allows you to properly encode the carrier’s size until it matches with the target. Keep in mind that some formats would be better suited than others. OpenPuff will alert you if the file type isn’t supported for being a carrier.

After Bit Selection, hit “Hide Data” and a new file will be created. On the outside, the carrier will look like a normal image file.

Unhide

Navigate to the Unhide option in the main menu and proceed to enter all the relevant details used for encrypting the file. Ensure that the passwords and bit Selection option are exactly the same as those used before, or else the file won’t open. Select your carrier file then, hit “Unhide” and Bam!! The target is now revealed.

openpuff-unhide

Decoy

You can also choose to fool any attackers by using the “Add Decoy” option. Simply head over the Hide menu, and after the previous four steps, select “Add Decoy”. You can add a file, just like when adding the target, and set multiple passwords for it. When you’re done, hit “Hide Data”.

Watermarks

Selecting the SetMark option, and adding a mark to a specified carrier can add watermarks. Similarly, CheckMark allows you to verify the watermark by selecting the carrier in question. You can also use CleanUp to remove a watermark from an image.

openpuff-setmark

In the End

Steganography has its disadvantages and controversies but when used effectively, it becomes an invaluable tool for covert transmissions. Not to mention those times when you just want to claim right to your work.

Make 3-D Glasses

3d_nasaReady to cry even harder as you viscerally experience the original FAIL Boat with Titantic 3D? You said you would never let go, after all. If so, make your glasses now so you won’t miss out.


What You’ll Need

  • Paper
  • Pencil
  • Sturdy cardboard, posterboard or cardstock
  • Scissors
  • Tape
  • Sheets of red and blue acetate (available at your local craft store)
  • Assorted decorations (optional)
  • For a quick alternative, simply print the pdf 3d glasses pattern below overhead projector transparency film on any color printer.

How To Proceed

1. First, design your glasses on paper in three parts. Include a frame front and two arms. Cut it out. This is your stencil. In Björk’s spirit, feel free to make them as creative or stylish as you like. But keep in mind: Intricate designs probably won’t transfer well when cut out of cardboard. Also, the glasses should probably fit your face. If you benefit from further illustrations check this how-to video out.There are some free templates on the web you can use, too. NASA provides a basic pattern as a downloadable PDF.

2. Check your stencil before continuing: Do your eyes and nose fit? Then trace your stencil on the cardboard.

3. Cut out the cardboard (don’t forget the eye holes!) and tape the arms to the frame front. Customize your glasses. Glitter glue is recommended.

4. Cut out a piece of red acetate and a piece of blue acetate, each a little larger than the eye hole. Tape a piece of acetate over each eye hole. While most versions of stereoscopic video have a very obvious orientation with the red on the right and the blue on the left, Björk’s website offers few clues. If in doubt, put the red film over the right eye. If it’s the wrong side, you can just flip the frame around. These glasses are versatile as well as attractive.

5. Test your glasses. View the image on the right through your glasses. It should appear in 3-D. There’s a pool dedicated to 3-D anaglyphs on Flickr with thousands of images, and even some 3-D videos. NASA’s Mars rovers also use two cameras to shoot landscape photos of the red planet. The results are stunning.

6. Enjoy the premiere! Now that you’re prepared, you are now able to enjoy many other illustrious examples of the 3-D film genre. IMAX doesn’t hold a candle to being able to elude Jaws right in your living room.

CD Jewel Case 3D Glasses Alternative with a couple of pens, a spare CD case and an inherent lack of shame, you’ll amaze yourself. And probably others, as well.
What You’ll Need

  • Red permanent marker
  • Blue permanent marker
  • CD Jewel Case

How To Proceed

1. Scribble blue and red marker pen on the CD jewel case about the width of your eyes.

2. Close yourself in a quiet room away from the ridicule, family and friends. Watch and enjoy.

Make an Encrypted Disk Volume With FreeOTFE

FreeOTFE is a free, open-source encryption program that allows you to use a single file, unformatted partition or unpartitioned disk space to securely store sensitive data on your computer. To access the data on an encrypted disk volume, you must mount it and provide a password. This makes the volume accessible as a new drive on your desktop. You can then store your sensitive files on this new encrypted virtual disk and unmount it when you’re done.

To get started, download the application from the FreeOTFE website and install it. FreeOTFE is available for all versions of MS Windows, and can also be used on Windows Mobile PDAs. Once you’ve installed the software, follow the steps outlined below.

Creating An Encrypted Volume

  1. Run FreeOTFE and click the “New” icon on the toolbar. The FreeOTFE Volume Creation Wizard will appear.
  2. The wizard is fairly self explanatory, and is simple enough to use. If you are unsure as to what options to select at any time, just leave them at their default values.
  3. When you’ve completed all of the wizard’s steps, click “Finish” to create your new volume. More advanced users may wish to click the “Advanced” option which will allow more technical options to be configured.

The volume will then be created, and automatically mounted, ready for use!

To dismount the volume created, just select it in the main window, and click the “Dismount” button on the toolbar.


Mounting and Using Your FreeOTFE Volume

  1. Run FreeOTFE and select the “Mount” button on the toolbar
  2. Select the FreeOTFE volume you previously created and click “OK”
  3. Enter your password and click “OK”

If you entere the right password, your volume will then be mounted, and will be available for use.

  1. When you want to open or save a file in your encrypted volume you can either click My Computer on the left side of the dialog box or chose My Computer in the drop-down list by “Open In:” (or “Save In:”) and then click on the drive letter you chose to mount your volume.
  2. You can move files into the encrypted volume by cutting and pasting it into the drive letter you chose, or just dragging them in
  3. You can also move files into the encrypted volume by simply dragging them to it using Windows Explorer
  4. To stop using a volume and secure it (or “dismount” it) to back to FreeOTFE, click on the drive letter you mounted the volume with and click the “Dismount” button.

Tips

  • FreeOTFE can be stored on a USB flash drive, and will allow you to carry your sensitive files around with you. If you do this, you may also want to take a look at FreeOTFE Explorer