How to: Create & Share your very own QR code

Recently, the QR Code system has become popular outside the automotive industry due to its fast readability and greater storage capacity compared to standard UPC barcodes. The code consists of black modules (square dots) arranged in a square grid on a white background.

QR_Code_Structure

QR codes can be used in Google’s Android operating system and iOS devices (iPhone/iPod/iPad), as well as by using Google Goggles, 3rd party barcode scanners, and the Nintendo 3DS. The browser supports URI redirection, which allows QR codes to send metadata to existing applications on the device.

QR Codes are an incredibly useful mobile marketing tool. Simply scanning a text is way easier than typing it on a tiny on-screen keyboard. Save your visitors time and thus increase your click rates!

qr-code-create

QR Codes make it possible to directly transfer a link to a mobile device. This greatly lowers the barrier to visit a website with such a device. But there’s more: You can also transfer your slogans, phone numbers or even complete business cards in the vCard format can be encoded with our QR Code generator and transferred to mobile devices. We are using goqr.me to demonstrate in this tutorial. Some other useful sites are : kaywa,  QR Code Generator, qrstuff.

  • Just type your text, URL, an SMS or your contact data here on goqr.me—the QR Code is created automatically.
  • You will see 5 Tabs from which you can select, say we choose TEXT.
  • Input whatever you want to generate at the time of scan.
  • And you are done, you can customize its color & style by clicking OPTION Button.

Now share it with your friends and family through social networks. Application that can be used to scan these QR/BAR codes is here [Barcode Scanner]. This app can also create some useful QR code inside your smartphone.

Create shortcut to modify registry files and add custom context menu

Have you ever wanted to create a shortcut which would speed up your registry editing skills ? or do you modify registry more frequently ? Here is a solution which will perform any task in less than 5 seconds. We will explain this tutorial by adding a custom option in windows Right Click Context Menu of a file. [Not Folder]

  • First, we’d launch Notepad or another text editor.
  • Next add this line at the top of file.

“Windows Registry Editor Version 5.00”

  •  After it add a blank line.
  • To create a key Directory in registry, add full path of it.

[HKEY_CLASSES_ROOT\*\shell\Open with Softnuke\command]

  • Now add name of key and its value in this format “”=”value”, value could be path of any file with which you want to open.

@=”notepad.exe %1”

  • %1 is used here to provide path of the specified file on which Right click is to be done and @ means default key in directory.

registry-shortcut-open-with-softnuke

  • Now save it as “softnuke.reg”. Always Save the file with the .reg file extension. You can double-click it to add the information to your registry.

A single .reg file can contain multiple entries, so you could have one .reg file that installs all your favorite shortcuts.

registry-shortcut-save

Now can use it the way you like, here is another example : Enable/Disable access of USB

Windows Registry Editor Version 5.00 [HKEY_LOCAL_MACHINE\SYSTEM\CurrentControlSet\services\USBSTOR\] “Start”=dword:4
  • Finally, to delete the folder and all its continents create a .reg file similar with (-)minus sign in front of its directory.
Windows Registry Editor Version 5.00 [-HKEY_LOCAL_MACHINE\SYSTEM\CurrentControlSet\services\USBSTOR\] “Start”=-

For any Queries please comment below.

registry-shortcut-context

Note: Users running earlier versions of Windows may want to substitute Windows Registry Editor Version 5.00 with REGEDIT4.

How to : Use Google Drive to Sync User Data in more than one PC

Google Drive is a great service no doubt, but simply installing the application, and synchronizing your files is just the first step. (The option for downloading and installing is available on the homepage of your online Google Drive at the bottom of the sidebar)

You can move your user data folders (Documents, Pictures, Music, Videos and Downloads) by right-clicking the folder and changing the destination path under ‘Location’ tab in the Properties menu.

  • Windows 7 users need to go to the Explorer panel to the left, Expend the collapsible Library folder, and right-click the “My Documents” or similar folder to get the properties menu.
  • Click on “Include a Folder”, Browse to Google Drive Sync Folder. Select “Set Save location”.

document-properties

  • Change the location of one of these folders to your Google drive folder to synchronize it between computers. Do this on each computer you use and you’ll have the same files in your Documents, Downloads, and all other folders on all your computers.

Note: If the amount of data you have exceeds the storage capacity of Google Drive (that is, if the data if more than 5 GB), then the above method will fail to completely transfer all the files. Once the storage limit of Google Drive is reached, you will unable to add any more folders/files to it, and in this case, to your user data folders as well.

Howto : Use USB Drive as a Hardware key for computer

Windows has an inbuilt system utility called SysKey that can help you use a normal pen drive as an access device instead of a regular text based password. To do this

  • First step is to assign A: as your removable disk drive. This is because the utility was designed to work with floppy drives.

change-drive-letter

  • To do this hit [Window] key and type “disk management” and press enter. Right click the relevant drive name of USB and change drive letter.
  • Now hit the [Window] key again and type Syskey and press Enter.

syskey-store-usb

  • Click update –> Store key on Floppy Disk. Click OK

After this a file called Startkey.key will be created on your pendrive and your PC won’t boot into your desktop unless the pen-drive is plugged into your system.

To revert back , just follow above procedure again and set STORE STARTUP KEY LOCALLY.

How to: Backup up your Facebook and Twitter account

Don’t Lose Your Tweets and Miss your Posts. Make Them Permanent

Facebook

Facebook allows you to backup all your data without using any third-party apps.

To do this, click on the drop-down menu next to your name in the top-right corner.

fb-twitter-backupGo to account settings and you will find a link which says “Download a copy of your Facebook data”. Once you click on it, Facebook will tell you what the backup will contain. It includes your photos, wall, posts, messages, chats etc.

Click on “Start My Archive” to begin the process. You will receive an email when your archive is ready for Download. The archive contains an HTML version of your account which you can store locally. Ensure that you save this data carefully.

fb-twitter-backup

Twitter

Twitter is sneaky little blue bird. While you’re happily tweeting away your pearls of wisdom on the micro-blogging site Twitter is busy deleting your old tweets. Yes, only 3,200 of your most recent tweets are available online. Imagine all those dear diary style ramblings, those witty innuendos, those wisecracks all gone! The horror! Fear not, there are several services such as Backupmytweets.com and Tweetbackup.com which will help you preserve all that you hold dear on Twitter. TweetBackup requires you to sign up using Twitter and an email address.

twitter-backup

Oauth will authorize the app and you will be on your way. Go to the export tab on the web UI and you can export your tweets as plain text or HTML.

BackUpMyTweets also works in a similar way except that you need to post an obligatory tweet about the service.

How to Spy on Your “Buddy’s” Network through Wireshark

Wouldn’t it be nice to just sit at your buddy’s house, plug into his network, and see exactly what he’s doing? What if it was as easy as that? What makes packet sniffers like Wireshark such potent tools is that a majority of local area networks (LANs) are based on the shared Ethernet notion.

In a shared Ethernet, you can think of all of the computers in a LAN as being plugged into the same wire, and all of the traffic that travels through it can be captured. Packet sniffers are more formally known as network analyzers and protocol analyzers. But what traffic are we talking about?

Everything. Granted encrypted data will be unreadable to you, you can still see it, and anything that is sent plain text (not encrypted) can be grabbed very easily. This includes passwords, logins, instant messaging conversations, emails, etc. Everything.

For example, assume that your network card picks up a packet fromsomeone else’s network. Normally, once the packet is handed off, the operating system must determine exactly what type of packet it is. To do so, it strips off the Ethernet header of the packet and looks at the next layer. Perhaps it’s an IP packet.. Well, the OS must now strip of the IP header and determine which type of IP packet it is. Finally, let’s say it’s determined that the packet is a UDP packet. The UDP header is stripped off and the packet payload (the data) is handed over to the application that the packet was sent to.

Now, this is an oversimplified version of what really goes on, but I’m trying to illustrate a point. Packet capture allows us to intercept any packet that is seen by the network device, and grab it in its entirety, headers and all. Regardless of which port is being sent to, or even which host, for that matter.

Let’s Steal Some Data!

If you’re running BackTrack, you already have this set up in your /pentest directory. Otherwise, let’s go ahead and grab the packages. If you want the latest version of 1.6.5, you must download and compile the source code. If you don’t mind the older 1.6.2 version, you can use the repositories. In this case, I recommend the repos if you feel shy about compiling from source and handling dependencies. If you want the bleeding edge, grab the source. As of this writing, it’s a small difference.

Free BSD users can type:
$ sudo pkg_add -r wireshark

Debian-based systems can type:
$ sudo apt-get install wireshark

Arch users can type:
$ sudo pacman -S wireshark-gtk

If you do wish to compile from source, follow along below:

Step 1 Get All The Required Packages

Make a new temporary directory, because we’re going to download some files. Wireshark also requires libpcapglib, and GTK+ as dependencies. Backtrack users should again be good to go, but others might need to get these packages first.

Download the source code with Wget and compile it up.

$ wget http://www.tcpdump.org/release/libpcap-1.2.1.tar.gz 
$ wget http://ftp.gnome.org/pub/gnome/sources/glib/2.30/glib-2.30.2.tar.bz2
$ wget http://ftp.gnome.org/pub/gnome/sources/gtk+/3.2/gtk+-3.2.2.tar.bz2

Windows users can grab the 32-bit and 64-bit versions of Wireshark. Linux users can simply retrieve the source code by typing:

$ wget http://wiresharkdownloads.riverbed.com/wireshark/src/wireshark-1.6.5.tar.bz2

Step 2 Build and Install the Dependencies

Untar each package you downloaded, then move into the new expanded directory and type the following for each:

$ ./configure
$ sudo make
$ sudo make install

Step 3 Build and Install Wireshark

Now we can get to installing our network protocol analyzer, Wireshark. If you have any issues or problems at this stage with dependencies, check out this helpful link.

To get started, let’s type:

$ tar xvjf wireshark-1.6.5.tar.bz2 && cd wireshark-1.6.5
$ ./configure
$ sudo make
$ sudo make install

Step 4 Configure, Capture and Conquer

Now that we have everything up and running, let’s go ahead and fire up Wireshark. We should be greeted with the following screen:

titlescreen-wireshark


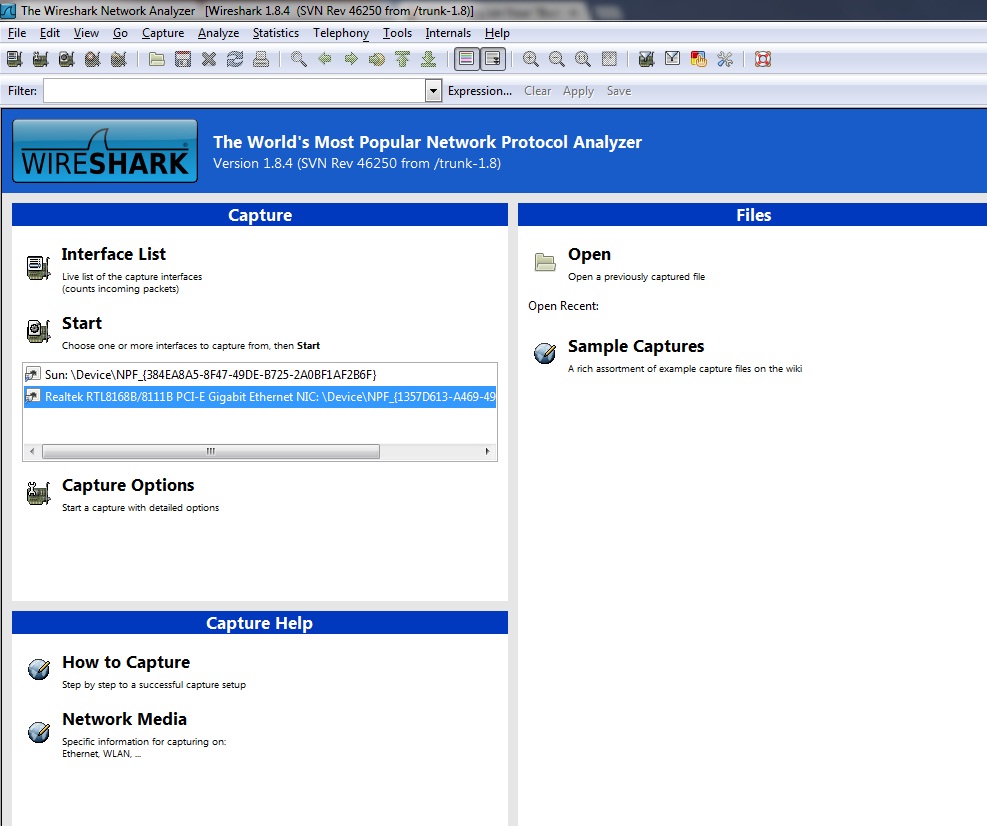
You’ll see a section titled Capture Help—I highly encourage first time users to give it a whirl. Also notice that if you had captured packets on another computer, you could import that file into Wireshark for analysis, as well.

Under Capture, it lists all the interfaces on your system Wireshark can use to listen in on. /dev/eth1 is my wireless interface, so let’s click on that.

capture-wireshark

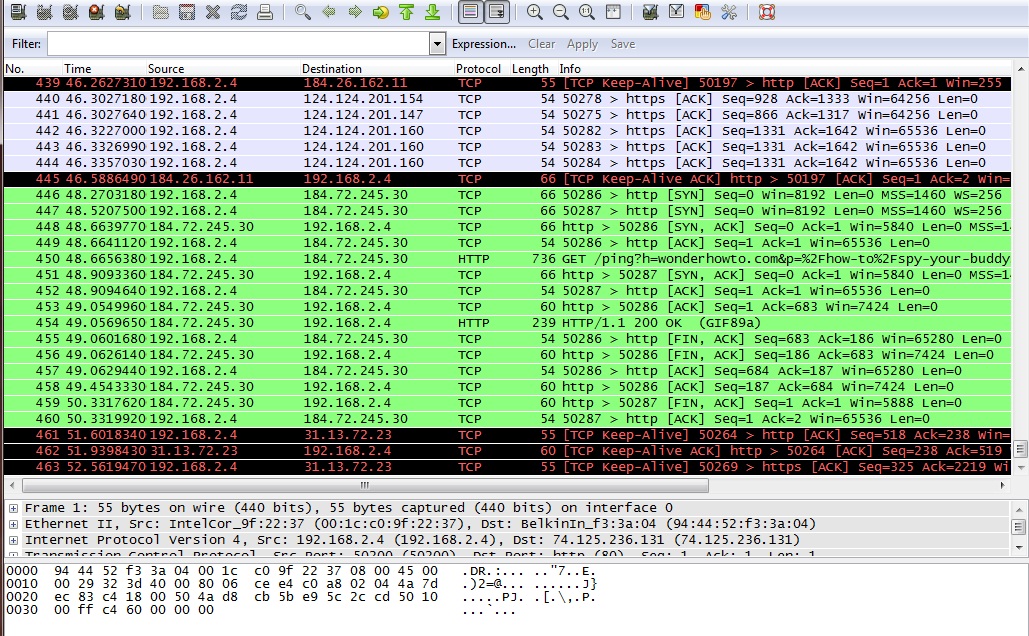
Here, we listened in on the interface only for a few seconds and picked up 24 packets. The first column lists the packet number, ordered in how they were received. The next column lists the time in seconds, which began when Wireshark started that session.

Source and Destination

The Source and Destination columns list the addresses contained in the header. You will notice packets that are addressed for you will show your internal IP address. This is because right now we are listening to the wireless traffic inside a network and as such, are behind the router. Packets coming to the receiving computer have already been stripped of the network IP address by the router. Remember how each layer of the OSI model can only talk to the layers above and below? That’s because as the data travels up and down the layers, the control info is added to it, and stripped off as it passes.

Next to that lists the Protocol of the packets received. Notice in the image where it says TLSv1 and Encrypted Alert in the info status? TLS stands for Transport Layer Security and if you remember from above, it runs on the transport layer.

Packet Overview

Under that lies an overview of the packet, giving you details such as size and what ports it was addressed to.

capture-window-wireshark

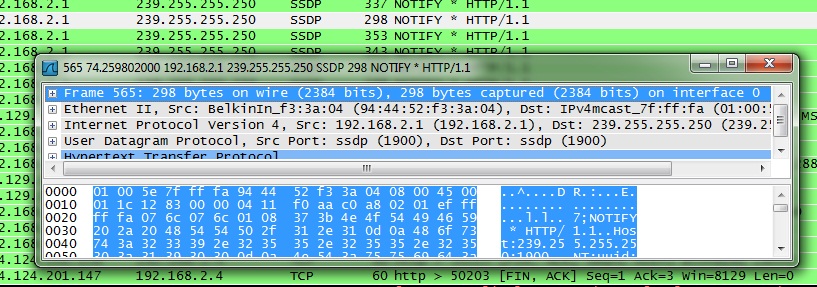
Click on one of the entries and move your keyboard arrows up and down. See how the highlighted block of jumbled letters and numbers moves along with it? All those jumbled letters and numbers are actually hexadecimal code, and next to it is a quick decoded overview of the data. If items are being transmitted encrypted, then this won’t be enough yet, but anything sent plain text will show up here.

In Action

Here, I opened my browser and typed www.google.com into the bar. Your computer sends a request to a DNS server to find out the IP associated with google.com. The server then returns the address back to you and your browser connects to it. We can see this in action by sniffing the traffic as it happens.

inaction-wireshark

Here you can see the protocol is DNS. The first packet is querying the server and the second packet is responding.

In Closing

Whew, that was a long read, but hopefully it was full of good knowledge. Sniffing traffic is useful for a multitude of reasons, from protecting your network from leaks by testing it out, to peeking at data that was not meant for your eyes. Next week, we’ll get into advanced capturing of wireless packets, and dig into Wireshark a little more deeper.

How to block access of USB

USB access is something that can affect your computer in a variety of ways. Whether you’re protecting your computer against viruses or malware, or you don’t want anybody to have the ability to copy files onto a USB memory stick, you will need to restrict the access to the USB ports on your system. Setting this up will give your computer the security it needs and keep your data safe.

  • Click “Start” and select “Run.”
  • Type “regedit” into the box and press “Enter.”
  • Look for “HKEY_LOCAL_MACHINE\SYSTEM\CurrentControlSet\Services\UsbStor.”
usb-block
  • Select the “USBSTOR” entry.
  • Right-click on the “Start” file on the right and select “Modify.” Change the value to “4” to deny access to the USB ports.
  • To enable it , just turn back value  to “3”.

You can speedup the process by creating desktop shortcut of this procedure. Learn from here: Create shortcut to modify registry files

Note: You need administrator privileges for this.

How to Create Your Own Run Commands

The Run command on Microsoft Windows operating system allows you to directly open an application or document with just a single command instead of navigating to it’s location and double-clicking the executable icon. However, it only works for some of the inbuilt Windows programs such as Command prompt (cmd), Calculator (calc) etc.

So, have you ever wondered how to create your own customized Run commands for accessing your favorite programs, files and folders? Well, read on to find out the answer.

Creating the Customized Run Command:

Let me take up an example of how to create a customized run command for opening the Internet explorer. Once you create this command, you should be able to open the Internet explorer just by typing ie in the Run dialog box. Here is how you can do that.

  1. Right-click on your Desktop and select New -> Shortcut.
  2. You will see a “Create Shortcut” Dialog box as shown below

  3. Click on “Browse”, navigate to: Program Files -> Mozilla Firefox from your Root drive (usually C:\) and select “firefox” as shown in the above figure and click on “OK”.
  4. Now click on “Next” and type any name for your shortcut. You can choose any name as per your choice; this will be your customized “Run command”. In this case I name my shortcut as “ff“. Click on “Finish”.
  5. You will see a shortcut named ff on your desktop. All you need to do is just copy this shortcut and paste it in your Windows folder (usually “C:\Windows\”). Once you have copied the shortcut onto your Windows folder, you can delete the one on your Desktop.
  6. That’s it! From now on, just open the Run dialog box(Win+R), type ff and hit Enter to open the Mozilla Firefox.

In this way you can create customized Run commands for any program of your choice. Say ie for Internet Explorer, gt for Google Talk, vlc for VLC media player and so on.

To do this, when you click on “Browse” in the Step-3, just select the target program’s main executable (.exe) file which will usually be located in the C:\Program Files folder. Give a simple and short name for this shortcut as per your choice and copy the shortcut file onto the Windows folder as usual. Now just type this short name in the Run dialog box to open the program.

How to Restrict Hard Drives in Windows 7 for User Accounts

You can restrict access to a hard drive in Windows 7 for other user accounts in the same computer. This is useful if you have files on a hard drive that you do not want anyone else to access. Only specified user or Administrator will be able to access these. You can also change other settings, such as only allowing a user to view a file and not change it.

Steps to Follow :

  • Log on to your computer with an account with Administrator rights. Click “Start,” type “user” (without quotes) in the automatically selected “Search programs and files” search box and click “User Accounts.” Click “Manage another account.”


  • Click “Create a new account,” if you need to create a user account for other people that will be using the computer. If you already have another account set up, go to the next step. You need to have at least your user account and another one set up to restrict access to a drive. Type a name for the user and click “Create Account.”

  • Click “Start” and “Computer.” Right-click the name of the hard drive you want to restrict access to. Click “Properties.”

  • Click the “Security tab” in the “Properties” window that opened. Click “Edit…” and “Add…” in the “Select Users or Groups” window that opened.
Restrict-Hard-Drives-in-Windows-7-1
  • Type the name of the other user account on your computer or you can click “Advanced” and then “Find Now”, then select your user account. Click “OK.” Uncheck the boxes to the left of any options that you do not want the user to have available. Check the “Deny” box for “Full control” to disable all control from the user for files on the hard drive.
Restrict-Hard-Drives-in-Windows-7
  • Click “OK,” “Yes” and “OK.” Close any open windows. Click “Start,” log off of your account and log on as the other user to test your settings.

  • Click “Start,” “Computer” and double-click the name of the hard drive you restricted access to. A window indicating that “Access is denied” is shown. Close the window and log off the computer.

And you are done.

How to change permissions in Windows 7

If you are a Windows 7 user, then you are most likely to be aware of the fact that you need to TAKE OWNERSHIP of files and folders before you can make any changes to them. This feature was introduced first in Windows Vista and later in Windows 7 in order to prevent any unauthorized changes from being made to the system files.

  • Right-click the file or folder on which you want to take the ownership and then click on Properties.

  • Now go to the Security tab, click on Advanced button and then click the Owner tab.
  • Now, click on Edit and do the following:
    • Under the “Change owner to:” section, select the user or group to which you would like to grant the permissions and then click on the OK button.

    • If the user or the group to which you would like to grant permissions is not listed under the Change owner to: section, just click on Other users and groups and, under Enter the object name to select (examples), type the name of the user or group, and then click OK.
  • Now you should get the confirmation dialog box stating that the ownership is granted.