How to Change the Logon Screen of Windows 7

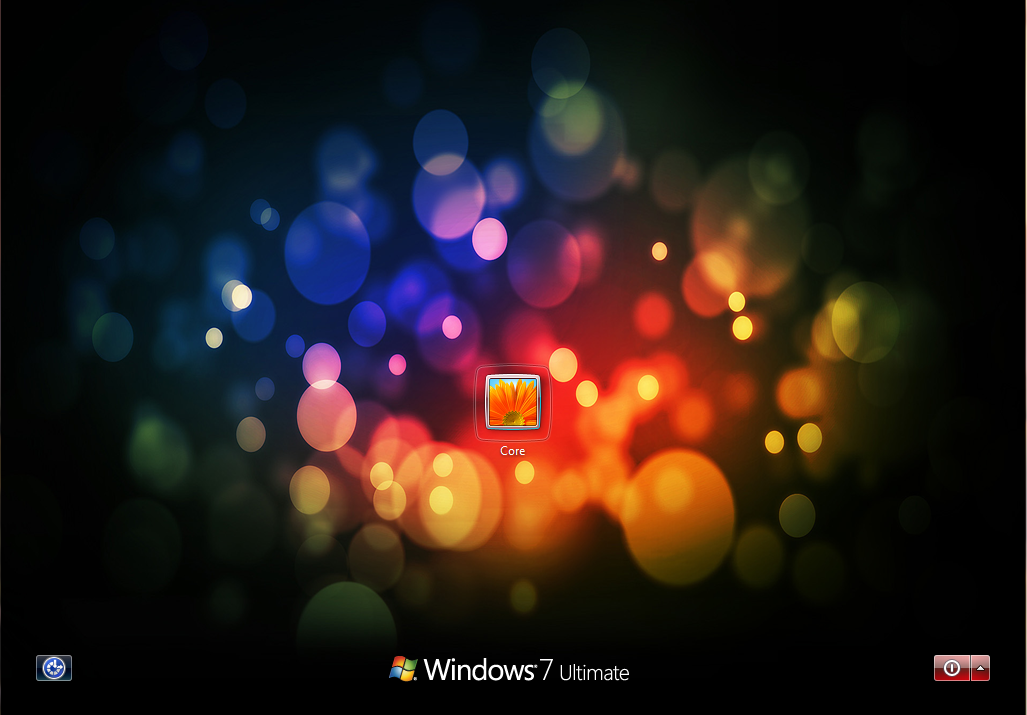
How would you like to change the logon screen background in Windows 7 so as to give your Windows a customized look and feel? With a small tweak it is possible to customize the Windows 7 logon screen and set your own picture/wallpaper as the background.

Changing logon screen background in Windows 7 is as simple as changing your desktop wallpaper. Well, here is a step-by-step instruction to customize the logon screen background:

  1. The image you need to set as the background should be a .jpg file and its size should not exceed 245KB, it can be smaller.
  2. The image resolution can be anything of your choice. However I prefer 1440 x 900 or 1024 x 768. You can use any of the photo editing software such as Photoshop to compress and set the resolution for your image. Once you’re done, save this image as backgroundDefault.jpg. (Rename it, otherwise it won’t work)
  3. You will need to copy this image to the following location:
    C:\Windows\system32\oobe\info\backgrounds

    You will need to create that path if it does not already exist on your computer.

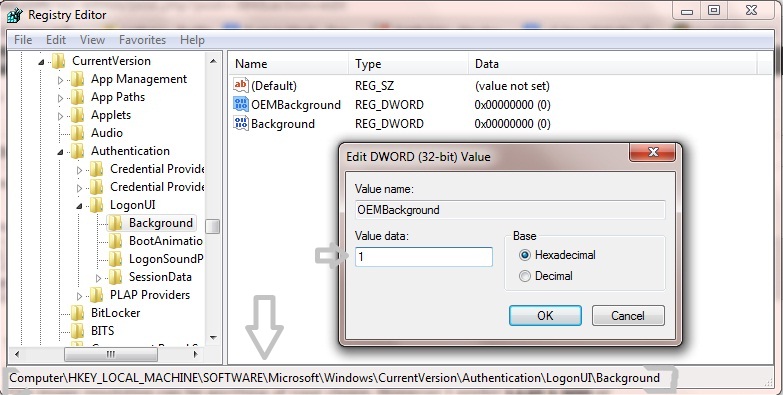
  4. Now, open the Registry Editor (Start -> Run -> Type regedit) and navigate to the following key:
    HKLM\Software\Microsoft\Windows\CurrentVersion\Authentication\
    LogonUI\Background

    If the key Background does not exist, then right-click on LogonUI, select New -> Key, and then name it as Background.

    Now locate OEMBackground (listed on the right side). If it does not exist, right-click Background and selectNew -> DWORD and name it OEMBackground.

    Win7Logon-Registry


  5. Double-click on OEMBackground and set the Value Data to 1.
  6. Now log-off to see the new logon screen background. If you would like to revert back to the default background, just set the Value Data back to 0.


How to disable Microsoft Windows XP Genuine Advantage Notifications

Important This section, method, or task contains steps that tell you how to modify the registry. However, serious problems might occur if you modify the registry incorrectly. Therefore, make sure that you follow these steps carefully. For added protection, back up the registry before you modify it. Then, you can restore the registry if a problem occurs. For more information about how to back up and restore the registry, click the following article number to view the article :

Fix it for me

To fix this problem automatically, click the Fix it button or link. Click Run in the File Download dialog box, and follow the steps in the Fix it wizard.

Disable WGA notifications Microsoft Fix it 50583

Notes

  • This wizard may be in English only. However, the automatic fix also works for other language versions of Windows.
  • If you are not using the computer that has the problem, save the Fix it solution to a flash drive or a CD and then run it on the computer that has the problem.

Let me fix it myself

  1. Log on to the computer by using an account that has administrative permissions.
  2. Make sure that the WGA Notifications version that exists on the computer is a pilot version. The version format for the pilot version is 1.5.0532.x. In this case, you can uninstall versions 527-532 only. For example, you can uninstall versions that range from 1.5.0527.0 to 1.5.0532.2. To find the WGA Notifications version, follow these steps.
    1. Click Start, and then click Control Panel.
    2. Double-click Add or Remove Programs, click Windows XP – Software, click Windows Genuine Advantage Notifications, and then click Click here for support information.
    3. In the Support Info dialog box, verify the version number, and then click Close.
  3. Rename the following files by changing the extension to .old:
    • Rename %Windir%system32WgaLogon.dll to %Windir%system32WgaLogon.old
    • Rename %Windir%system32WgaTray.exe to %Windir%system32WgaTray.old
  4. Restart the computer.

Manually uninstall WGA Notifications

  1. Log on to the computer by using an account that has administrative permissions.
  2. Make sure that the WGA Notifications version that exists on the computer is a pilot version. The version format for the pilot version is 1.5.0532.x. In this case, you can uninstall versions 527-532 only. For example, you can uninstall versions that range from 1.5.0527.0 to 1.5.0532.2. To find the WGA Notifications version, follow these steps:
    1. Click Start, and then click Control Panel.
    2. Double-click Add or Remove Programs, click Windows XP – Software, click Windows Genuine Advantage Notifications, and then click Click here for support information.Note: If Windows Genuine Advantage Notifications does not appear, the release version is installed. You cannot uninstall the release version of WGA Notifications.
    1. In the Support Info dialog box, verify the version number, and then click Close.
  3. Rename the following files by changing the extension to .old:
    • Rename %Windir%system32WgaLogon.dll to %Windir%system32WgaLogon.old
    • Rename %Windir%system32WgaTray.exe to %Windir%system32WgaTray.old
  4. Restart the computer.
  5. Unregister LegitCheckControl.dll by using Regsvr32. To do this, follow these steps:
    1. Click Start, click Run, type cmd, and then click OK.
    2. At the command prompt, type the following, and then press ENTER:
      Regsvr32 %Windir%system32LegitCheckControl.dll /u
  6. Restart the computer.
  7. Click Start, click Run, type cmd, and then click OK.
  8. At the command prompt, delete the following files by typing the Del command. Press ENTER after you type each command.
    • Del %Windir%system32wgalogon.old
    • Del %Windir%system32WgaTray.old
    • Del %Windir%system32LegitCheckControl.dll
  9. At the command prompt, type regedit.
  10. Locate and then right-click the following registry subkeys. Click Delete after you locate each subkey.
    • HKEY_LOCAL_MACHINESOFTWAREMicrosoftWindowsNT CurrentVersionWinlogonNotifyWgaLogon
    • HKEY_LOCAL_MACHINESOFTWAREMicrosoftWindows CurrentVersionUninstallWgaNotify

How to Encrypt Your Pen Drive

Encrytion on Various Platforms

Encrytion on Windows

There are a variety of Windows-based tools for creating an encrypted volume on a USB stick, but our favorite is the free, open-source FreeOTFE. FreeOTFE uses on-the-fly encryption, which means that data is automatically encrypted and decrypted without you needing to do anything other than enter a password or possess the right keyfile.

To get started, download and install FreeOTFE. Then open the application and select your USB cick on the “New” icon. FreeOTFE will then walk you through the process of setting up your encrypted volume and help you choose an encryption algorithm or set other options.

Once FreeOTFE finishes, your USB stick will contain an encrypted volume where you can store sensative data to keep it safe from prying eyes.

True Crypt

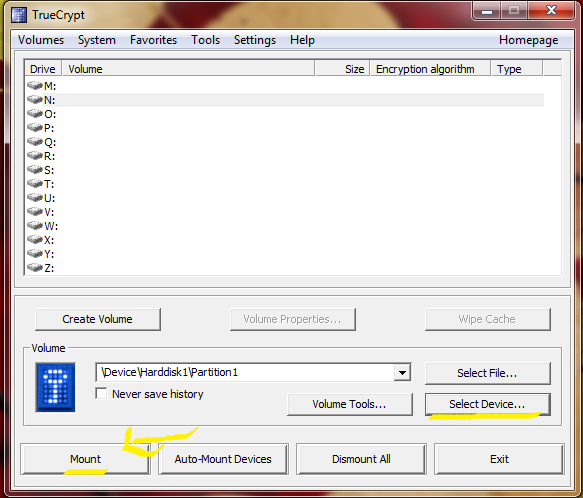
An alternative system is TrueCrypt, although unlike FreeOTFE, this requires you to have administrator rights to even start it on any computer you wish to use your encrypted thumb drive on.

Encryption on Mac OS X

Mac OS X actually has a nice built-in encryption tool you can use right out of the box.

To get started, just plug in your USB stick and open up Disk Utility (you’ll find it in the Utilities folder inside your Applications folder).

In Disk Utility head to File >> New >> Blank Disk Image. Select your USB stick as the destination and choose one of the encryption options. You can also set the size of the volume, number of partitions and the format.

Once that’s done click create and enter a good password .

Alternativly, there is a Mac version of TrueCrypt which may be used.

Cross-Platform Encryption

For accessing data across MS Windows and Windows Mobile PDAs, the previously mentioned FreeOTFEserves as a solid open-source cross-platform option.

For use with Windows, Linux and Mac OS X machines, TrueCrypt can also be used.

How to Unblock Internet Filter

These days, schools are so strapped for cash, they cant afford the Internet bandwidth for students to do useful and fun thing on school computers. Some schools expect students to actually do work during IT lessons, and some IT departments just don’t like YouTube. However, the days are over when they can lock down the system enough to stop determined students from using the Internet as they please.

De-filters

These are websites which take a URL, and collect the content for you. The work because the filters only see you downloading data from an unblocked website (the de-filter); the connection to the banned site is from another external web server so it doesn’t pass through your schools filters.

These are some good de-filter websites:

These are just a few of the hundreds of de-filter websites revealed by a quick google search. Where possible, tick the box that turns on some kind of encryption. This prevents the IT department seeing what sites you gave unblocked. Also, sites that use the HTTPS protocol are even harder to be caught with.

hide my ass

However, de-filter sites do not always unblock active content such as flash, or videos so they are not perfect. If you find a good de-filter, don’t give it to anyone because it will soon spread round the school, and end up blocked.


Using a new proxy

Most school filters work by directing all traffic through a proxy server, which scans URLs for blocked keywords. Internet Explorer uses the system wide proxy for HTTP. However, FireFox can have its own proxy set. Firefox will route all traffic through the open proxy server, avoiding using banned keywords in the URL. This traffic will then be sent through the filter proxy by the operating system, but will not be blocked if all has worked well.

1) Get a copy of FireFox on a memory stick. It’s best to use the portable version available here because it wont leave evidence of running FireFox on the main system hard drive. This version also remembers your bookmarks, passwords etc.

2) Set up FireFox to a proxy. Open the Tools menu, then click Options. Then click the Connection Settings button in the resultant window. Click the radio button for “Manual proxy configuration”, and fill in relevant proxies/port numbers. A list of free proxies and port numbers is available here. Now, all should work as planned.

HTTPS

This is the most simple of them all but sometimes does not to work. It’s as simple as just adding an S on to the http. so lets say for example http://www.facebook.com/ you would change it to https://www.facebook.com/

https facebook

UltraSurf

In my high school we use a program called UltraSurf. http://www.ultrareach.com/ All you need to do is download this to a flash drive (some kids save it to our student drives on our network, but I don’t suggest this as the IT department will find out) and when you are at school run it. It will pop up with a new browser window and viola! Surf the net as you please!

URL Filter Bypassing

It’s possible for internal employees to bypass Web-content filtering applications and logging mechanisms to browse to sites that they shouldn’t go to — potentially covering up malicious behavior and Internet usage.

Easier hack is to exploit the general mechanism built into URL filtering systems that filter Web traffic based on specific URLs and keywords (words that match a list or meet a certain criteria). Users take advantage of this practice by converting the URL to an IP address and then to its binary equivalent. The following steps can bypass URL filtering in such browsers as Netscape and Mozilla:

  •  Obtain the IP address for the Web site.

For example, a gambling Web site (www.go-gamblin.com) blocked in Web-content filtering software has this IP address: 10.22.33.44 This is an invalid public address, but it’s okay for this example; you may want to filter out Web addresses on your internal network as well.

  • Convert each individual number in the IP address to an eight-digit binary number. Numbers that may have fewer than eight digits in their binary form must be padded with leading zeroes to fill in the missing digits.

For example, the binary number 1 is padded to 00000001 by adding seven zeroes. The four individual numbers in the IP address in Step 1 have these equivalent eight-digit binary numbers:

10 = 00001010

22 = 00010110

33 = 00100001

44 = 00101100

The Windows Calculator can automatically convert numbers from decimal to binary notation:

i. Choose View➪Scientific.

ii. Click the Dec option button.

iii. Enter the number in decimal value.

iv. Click the Bin option button to show the number in binary format.

  •  Assemble the four 8-digit binary numbers into one 32-digit binary number. For example, the complete 32-digit binary equivalent for 10.22.33.44 is 00001010000101100010000100101100 Don’t add the binary numbers. Just organize them in the same order as the original IP address without the separating periods.
  • Convert the 32-digit binary number to a decimal number. For example, the 32-digit binary number 00001010000101100010000100101100 equals the decimal number 169222444. The decimal number doesn’t need to be padded to a specific length
  • Plug the decimal number into the Web browser’s address field, like this: http://169222444
  • The Web page loads easy as pie! The preceding steps won’t bypass URLs in Internet Explorer.
How to Access Shared Folders of Windows 7 and Stream Videos on Android over wifi

Want to play videos from your computer on your Android, without the hassle of copying them to your device’s internal storage? Share a folder over the network with Windows. You can copy files back and forth over Wi-Fi, too.


Sharing Folders on Windows 7

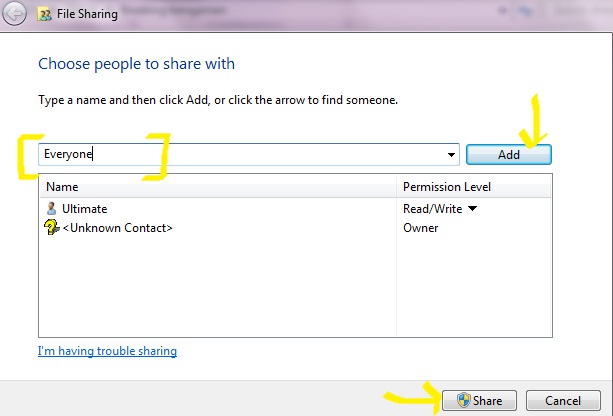
To share a folder and make it accessible from Android, you’ll need to share it with “Everyone.”

To do this, navigate to the folder you want to share, click the Share with menu, and select Specific people.

windows android stream

Enter “Everyone” in the box and click the Add button. Select Everyone by clicking on it.

By default, Everyone will only have Read permissions – if you also want to copy files from your Android to the shared folder, you can change the permission level to Read/Write.

Click the Share button after configuring your permissions.

win-droid-share

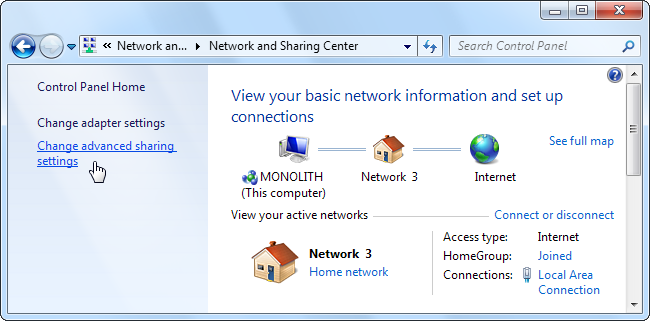
Next, go to the Network and Sharing Center. Click Start, type “Network and Sharing” and press Enter to quickly open it.

win-droid-share

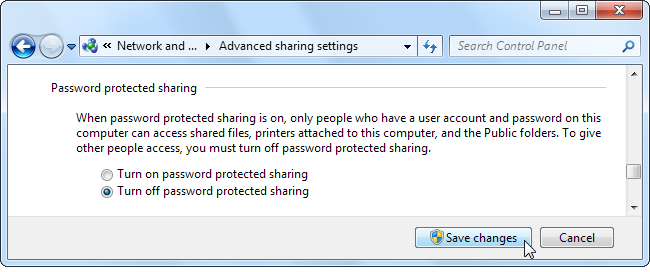
In the Advanced sharing settings, you may want to disable password-protected sharing. If you disable password-protected sharing, only folders you share with “Everyone” will be accessible without a password.

You can also try leaving password-protected sharing enabled, in which case you’ll need to enter user account credentials before connecting to your shared folder on Android. This may work, although I couldn’t get it to work, myself.

win-droid-share


Accessing Shared Folders on Android

To access the shared folder on Android, we’ll use ES File Explorer. It’s high-quality, free, and supports Windows shared folders with the SMB protocol.

From ES File Explorer’s main screen, swipe from the right to the left to access the LAN section. You can also tap the Local option at the top left corner of the screen and select LAN in the list.

Tap the New button on the toolbar in the LAN Shares section and select Scan to scan your network for PCs sharing files. You can also tap New and select Server to enter your computer’s IP address manually.


After the scan is complete, tap a computer to view its shared files. If ES File Explorer finds your computer but continues scanning for more computers, tap the screen to stop the scan process.

win-droid-share

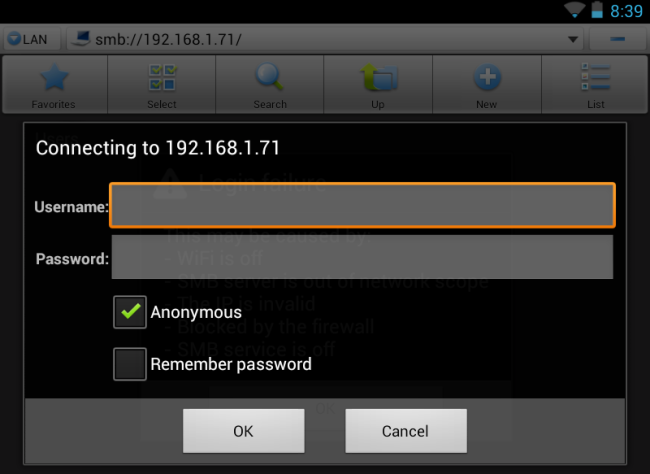
Log in as Anonymous if you disabled password-protected sharing earlier. If you didn’t, try to log in with your Windows username and password – this never worked for me, however.

Browse to the folder you shared in your computer’s file system. I shared my D drive, so I’d tap D, tap my user account’s name.

While we can see other shares like C$ here, they aren’t accessible. We’d see an error message if we tried to access them anonymously.

Tap a video, music file, image, text file, or any other type of file to view it. You can also long-press a file to view a menu and optionally copy it to your device.


If you tap a file type Android supports – such as an MP4 video file – it will open immediately and start streaming to your device.

How to Find Out What’s Keeping Your Computer from Going to Sleep ?

So your computer is set to go to sleep after a half hour of inactivity, but the darn thing never actually goes to sleep. Want to figure out what’s keeping it awake? Here’s a quick command for Windows and OS X that’ll let you know.

A lot of things can keep your computer from going to sleep, like downloading a file, opening a file on the network, or even a disconnected printer with an open job. Luckily, both Windows and OS X have an easy method for finding out what the problem is. If you’re on Windows, go to Start > Programs > Accessories, right-click on Command Prompt, and open it as an administrator. Then type:

  • powercfg -requests 

    computer-awake

It’ll let you know if anything is keeping the computer awake. In the screenshot above, for example, it told me that I had a file open in PotPlayer that was preventing my computer from sleeping (since the file resided on the network).

If you’re on a Mac, go to /Applications/Utilities, open up the Terminal, and type:

  • pmset -g assertions 

It’ll tell you if a device is preventing sleep, and what process that is.

How to Export/Backup Windows Registry

The Windows Registry is a hierarchical database that stores configuration settings and options on Microsoft Windows operating systems. It contains settings for low-level  operating system components as well as the applications running on the platform: the kernel, device drivers, services, SAM, user interface and third party applications all use the registry. The registry also provides a means to access counters for profiling system performance.

Its easy and fast, you can make a backup file for all of your registries stored in OS. You can also select a specific registry to backup if you want to.

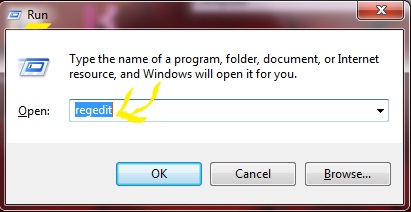
Step 1 : Go to Start and enter ‘regedit’ in search bar or press Win+R to open RUN then type regedit and hit enter.

Regedit

(Optional)Step 2 : Windows will ask you to allow executing it, select YES. A new window of Registry Editor will open.

Step 3 : You can see the window is divided into two parts, left one looks like a hierarchy of all registry stored. If you want to backup a specfic one then find it and select it otherwise click My Computer.

Regedit export

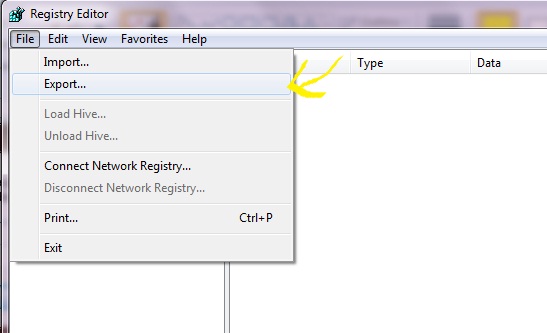
Step 4 : Now Go to File >Export. Browse the location where you want to export your backup and click SAVE. It will take 2-3 mins according to your computer specifications to do it so have patience !!.

Step 5: Voila !! and your are Done. Later on if you want to restore Just open back the exported file again by double clicking it.

*You can also explore it by opening through a notepad .


Have You Ever Heard Google Beatboxing?

When you have questions, who do you ask for? Google. When you need directions, who do you call for help? Google Maps. When you want to hear a nice beatbox, who do you listen to? Google Translate. Huh? Well, you read that right! Google is not just an awesome dictionary, map, and translator, but also a great Beatboxer!

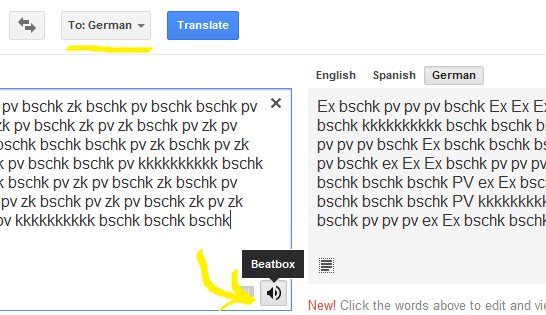
1. Go to Google Translate and copy paste the texts below in the translate field.

pv zk bschk pv zk pv bschk zk pv zk bschk pv zk pv bschk zk bschk pv bschk bschk pv kkkkkkkkkk bschk bschk bschk pv zk bschk pv zk pv bschk zk pv zk bschk pv zk pv bschk zk bschk pv bschk bschk pv kkkkkkkkkk bschk bschk bschk pv zk bschk pv zk pv bschk zk pv zk bschk pv zk pv bschk zk bschk pv bschk bschk pv kkkkkkkkkk bschk bschk bschk pv zk bschk pv zk pv bschk zk pv zk bschk pv zk pv bschk zk bschk pv bschk bschk pv kkkkkkkkkk bschk bschk bschk pv zk bschk pv zk pv bschk zk pv zk bschk pv zk pv bschk zk bschk pv bschk bschk pv kkkkkkkkkk bschk bschk bschk

google-beatbox

2. Set the “to” language to German and press listen. You’ll notice that the listen button has now been changed to Beatbox when you hover over it.


3. Enjoy Google Translate beatboxing for you!


How to Unplug USB devices without removing it safely

If you unplug a storage device from your computer while it’s transferring files, there’s a big chance that you lose some information or worst, your USB flash drive might get corrupted. Good thing Windows has a Safely Remove Hardware option which lets you unplug your flash memory safely. However, for most people, they find it very time consuming to go through this step every time they remove their USB from their PC. So if you’re looking for a simple way to enable quick removal of USB devices and bypass Safely Remove Hardware, this post is for you.

How to bypass Safely Remove Hardware option when unplugging USB devices:

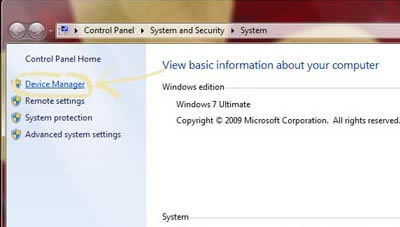
1. Open Device Manager. You may find it by searching “Device Manager” in the Start menu search field or in the Control Panel or follow: Right Click My Computer > Properties > Device Manager [Left].

device manager

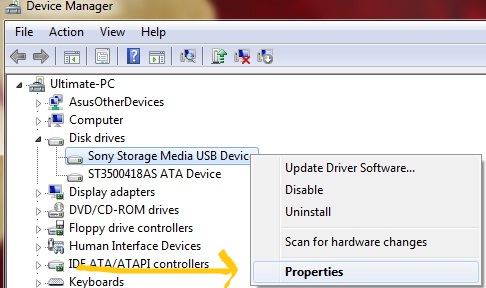
2. Look for USB Devices/Disk Drives. Click Disk Drives to expand and reveal your internal and external drives. TheUSB devices will always have “USB” included in their names.

device manager

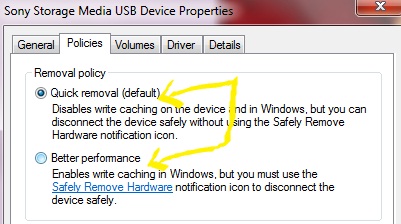
3. Choose Quick Removal. Double-click the USB device for which you want to disable the Safely Remove Hardware option. A new window will open, go to Policies tab. You’ll see two removal policies: Quick Removal and Better Performance. If you choose Better Performance, you will need to use the Safely Remove Hardware option every time you disconnect your USB while the Quick Removal policy lets you disconnect the device safely without using the said option.

Device manager policies

Play Snake & Tetris on Youtube & utorrent

Tetris game on uTorrent? How about snake game on YouTube? Sounds weird but it’s true! I’m sure most of you are already familiar with these tricks but for the benefit of our other friends who don’t know it, let me show you how simple it is to unlock these hidden games.

How to unlock the hidden Tetris/Brick game on uTorrent:

* You must have uTorrent installed on your PC to follow these steps.

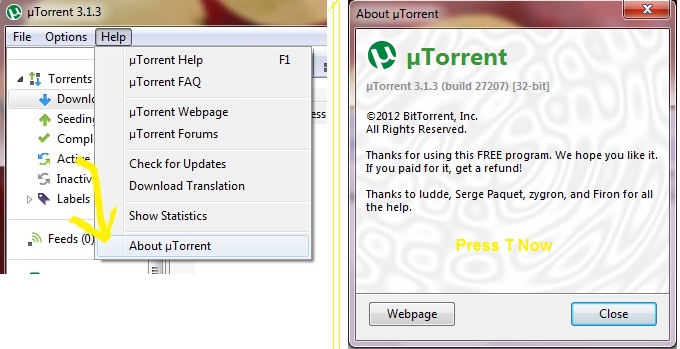
1. Launch uTorrent. Go to Help and click “About uTorrent”.

utorrent tetris

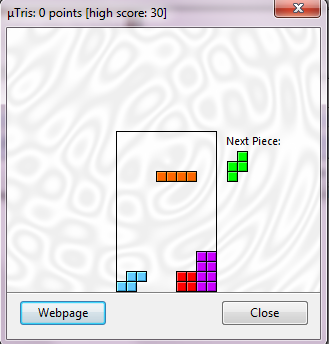
2. Press the letter “T” on your keyboard. Voila! You have now unlocked the Tetris game.

Tetris

 Next, how to play the Snake game on YouTube:

1. Open your browser and play any video on YouTube.com. 2. Make sure the player has focus (try pausing and resuming the video), hold the left key for about 2 seconds and press the up key, while still holding the left key.

Voila! You can now play snake while watching the video.

Youtube Snake Game

*Just pressing Up key on your keyboard probably also works when in focus.