How to: Create your own File Encryption Application

Everyone has secrets, Those who don’t still want some things to stay hidden. Most of you would have already used software that are capable to lock your files and after that can only be accessible with a password (like WinRar). We are not discussing here how WinRar does that, but we will be discussing how you can create a simple application in C++ which will allow you to encrypt your text files in a way after which it will just look like a trashed content.

Encryption techniques are not new, they have begun thousands of years ago. It is generally termed as cryptography where we convert our original content to something which cannot be understood. Of course we can convert back the unreadable content to original but this can only be done if we knew how it was encrypted.

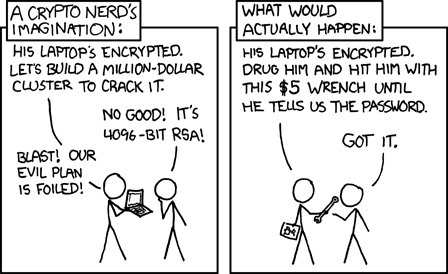
XKCD security

XKCD security comic.

To get an idea what it is let’s take a scenario:

I have a message that is highly important to get delivered to my friend. He lives across the street but I cannot go and meet him personally. So only way to communicate is by taking a white board and writing down my message, big enough that it can be seen from at least 50m. Then I will wave it from the terrace so that he can read it. Problem is when I show him the board, everyone else too has access to read the message. But to tackle this situation we have already planned a crypto technique which we can use while sharing secret messages.

Message I want to share: “Dude! I asked her out today.”

Message I am going to write on board: “04210405 09 01191190504 080518 152120 2015040125”

As you can see, this doesn’t make any sense if you don’t know the technique how it was ciphered. In this case, the methodology is extremely easy just to demonstrate. I have replaced each alphabet with its corresponding digit in sequence using two decimal digits (01,02,…,26). To get back the original text, I just need to follow the same process backwards by putting back alphabets in place of its number. Even this simple technique can be upgraded using “salt”. No! I am not talking about the one we eat, salt is a generic term used to add additional attributes in a predefined function. Here our function is defined by converting alphabet to number. On Wikipedia, “In cryptography, a salt is random data that is used as an additional input to a one-way function that hashes a password or passphrase”. Attribute could be anything depending upon the encryption algorithm. Say every time I convert alpha to numeric 50(salt) is added if it’s a vowel and space is replaced by 99.

alpha2num CheatSheet

A little improved message:

“04710455990999511911955049908551899657120992065045125”

While decrypting this, few points need to be kept in mind that is if the message contain any number above 26 then that should be subtracted from 50 because it’s a vowel and that 99 denotes space between words.

Let’s go back to our topic, in our application you need to have at least a basic idea of C++ language and a compiler to create a finished software once we finished coding. I will only be explaining important part briefly. Software requirements for our experiment are:

Test your working environment by running this peace of code:


#include<iostream>
int main(){
cout<<”Good to go!”;
return 0;
}

Keep in mind C++ is a case-sensitive language (small a and capital A are treated different). Once your program compiled successfully and you see output in console we can move towards our encryption technique.

If you belong to computer science field, the term Bitwise Operations must be familiar to you but if not then please read it before going further. Easiest explanation could be, any operation that is done at individual bit level. Right now, XOR is the point of interest. To understand our algorithm, you are required to know how XOR works. The property that we are going to use of XOR here is:

Say we have a variable X whose value in binary format is “101” and a password key “111”, to cipher the value of X an operation of XOR is needs to be done on both of them. Formula for our algorithm can be described as “X XOR PASS = CIPHERED VALUE”. Here in our example it is

101 XOR 111 = 010

To get back the original value of X, XOR cipher value again with PASS “CIPHERED VALUE XOR PASS = X”. This property of XOR enable us to encrypt any binary data in a simplest way possible. Keep in mind, there are various ways to exploit this technique and any expert in deciphering can break this encryption when enough time is available. But you are not storing any thermal nuclear warhead blueprints or ways how a radioactive spider can make you Spiderman. As long as normal people (not so geeky) are considered, this technique is robust enough.

I am going to cut to the chase and go straight to the coding part. Open your compiler and create a new file. Start adding line of code describe below.


#include <iostream>
#include <fstream>
#include <string>
using namespace std;

These are the library required to successfully compile the program. All symbols in that namespace will become visible without adding the namespace prefix by using last line. Most of you professional coder might be angry for using this but right now, I am more focused on simplicity than flexibility.


void xor_encrypt(char *key, char *string, int n){
int i;int keyLength = strlen(key);
for( i = 0 ; i < n ; i++ )

{

string[i]=string[i]^key[i%keyLength];

}

}

xor_encrypt() function is the core part where all the magic happens. This function accepts three parameters:

  1. Password key
  2. String of text required to encrypt
  3. Length of string

Operator for XOR in C is (^) which is used as a unary operator between string and password. First the length of password is calculated to use it along with Remainder Operator for array index. This will keep our password within the limits of its size length. For loop is required to run until string length is exhausted. One thing to notice is we are not returning anything from this function instead pointer is used to update the string by its reference.


int main(void) {
char key[] = "AllHailTheKingKush1212HAHA1212hehe";
char LOCKEDFILENAME[] = "locked.txt";
char UNLOCKEDFILENAME[] = “unlocked.txt”;

int choice;

bool lock=false;

streampos size;

union

{

long long int n;

char ch[sizeof(long long int)];

} buffer;

choiceMaker:

cout<<“\nWhat would you like to do?:\n1)Lock\n2)Unlock\n”;

cin>>choice;

switch(choice){

case 1:lock=true;break;

case 2:break;

default:cout<<“Invalid choice, input only (1/2).\n”;goto choiceMaker;

}

main() function is the nervous system of this program (every C++ program). In the beginning declaration of variables that we are going to use is done.

  • Key variable holds the password that is required to lock and unlock our ciphered text.
  • Lock Boolean variable is used as a switch between encrypting and decrypting.
  • Union buffer will work as a temporary storage to hold data between the processing.
  • Switch statement will enable user to make a choice between lock or unlock a file. Supported inputs are Numeric 1/2, 1 will encrypt a normal file and 2 will decrypt back to original.

if(lock){
ifstream unlocked;ofstream locked;
unlocked.open (UNLOCKEDFILENAME, ios::binary);

locked.open (LOCKEDFILENAME, ios::binary);

if (unlocked.is_open())

{

unlocked.seekg (0, ios::end);

size = unlocked.tellg();

unlocked.seekg (0, ios::beg);

while (unlocked.read(buffer.ch,sizeof(buffer)))

{ cout << buffer.n << ‘\n’;

xor_encrypt(key,buffer.ch,sizeof(buffer));

locked.write(buffer.ch,sizeof(buffer));

}

cout<<“\nFile size:”<<size<<” Buffer size:”<<sizeof(buffer)<<endl;

cout << “\nLocked Successfully.”;

}

unlocked.close();

locked.close();

}

This part of code will read unlocked.txt file, cipher it and write it to locked.txt file.

  • First, the lock condition is evaluated whether it is true or not, if yes then it is good to go.
  • Two file streams are created to read and write file. This functionality is dependent on library we have imported above (fstream). One file will be used as an input and second as output, both of them are opened in binary format to keep the originality intact.
  • Is_open() function will ensure that the file is accessed successfully then seek is used to jump to end to calculate the length of file (this task is not necessary but will provide an insight how big file we are dealing with).
  • While loop perform three operation, firstly it reads the unlocked file step by step(depends on the buffer size) until it reaches to end, then it calls the core function of xor that will encrypt this piece of data and after that it is written back to locked file as ciphered text.
  • In between there is a cout line that enables a visual log of binary data that is going for encryption in this process.

Once this loop ends, some information of file and buffer size is printed on screen and file streams are closed to free up resources.


if(!lock){
ofstream unlocked;ifstream locked;
unlocked.open (UNLOCKEDFILENAME, ios::binary);

locked.open (LOCKEDFILENAME, ios::binary);

if (locked.is_open())

{

locked.seekg (0, ios::end);

size = locked.tellg();

locked.seekg (0, ios::beg);

while (locked.read(buffer.ch,sizeof(buffer)))

{ cout << buffer.n << ‘\n’;

xor_encrypt(key,buffer.ch,sizeof(buffer));

unlocked.write(buffer.ch,sizeof(buffer));

}

cout<<“\nFile size:”<<size<<” Buffer size:”<<sizeof(buffer)<<endl;

cout << “\nUnlocked Successfully.”;

}

unlocked.close();

locked.close();

}

}

These lines are mostly same as above lock code, the difference is we reverse the process and check if lock switch is false. If yes, then locked file will be taken as input and unlocked file will be created with deciphered text. Don’t forget the last “}” bracket, this is continued from the beginning of main function. Every “{” bracket is required to be closed with “}” in the end.

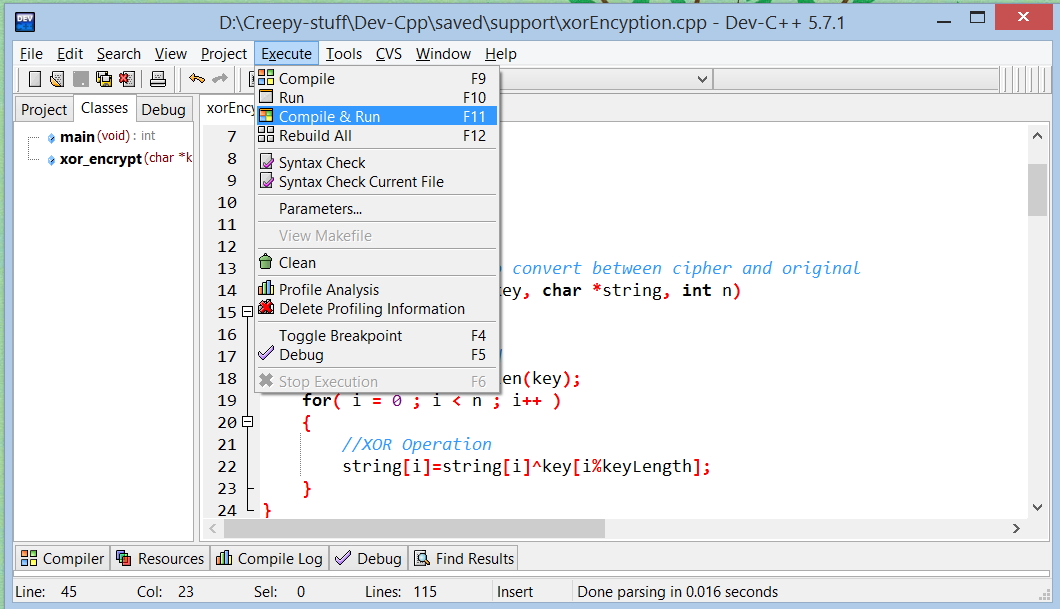
compile and run

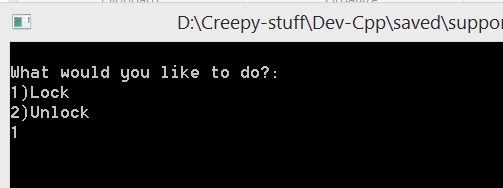
That’s it! Coding stage is completed, compile the program and run it. Before running, go to the directory where you have saved this program and create a dummy text file. File should be named as “unlocked.txt” otherwise our ultimate machine of encryption won’t work. Write some text into this file for testing purpose, save it. Compile & Run the program, Press 1 and hit enter.

directory browse

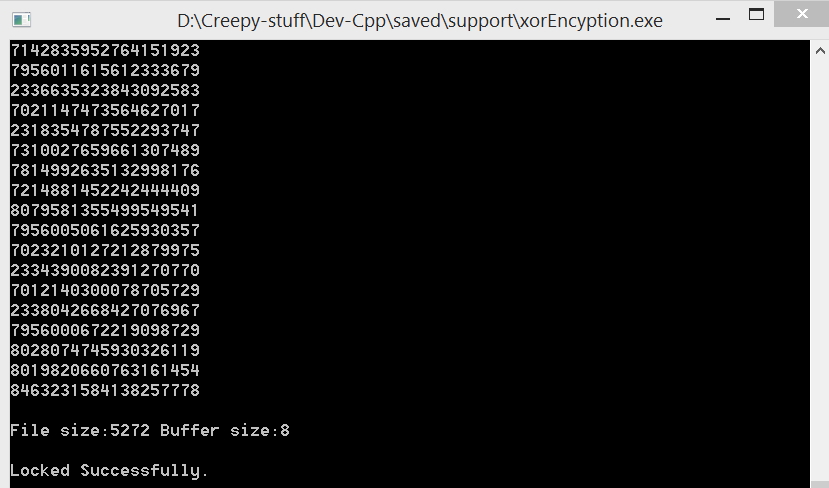
If you see some binary numbers floating down the screen and a line stating “Locked Successfully” this means you have created your first very own encryption software in 15-30 minutes. But in case, compilation error or anything not so cool pop up then try to debug the code. Don’t forget even the simple “;” semicolon can stop the whole program from executing, try searching for case-sensitive errors. Don’t worry, I will be adding an attachment of .cpp file created by me. You just have to compile and run. Once it is compiled successfully a new executable (.exe) file will be created if you are using Microsoft Windows. This file enables you to directly run the program without compiling again and again.

preview choice

Now you can use your own tool for encryption and it’s free! Since you created it! Try decrypting the locked file again, this will give you back the original in unlocked.txt. Keep in mind, the longer your password is, harder it is to crack the encryption (keep it at least more than 20 words).

preview locked

Here is all the code collectively:

#include <iostream>
#include <fstream>
#include <string>
using namespace std;//encryption function to convert between cipher and original
void xor_encrypt(char *key, char *string, int n)
{
int i;
//length of password
int keyLength = strlen(key);
for( i = 0 ; i < n ; i++ )
{
//XOR Operation
string[i]=string[i]^key[i%keyLength];
}
}

int main(void) {

char key[] = “AllHailTheKingKush1212HAHA1212hehe”; //password, this can be changed according to your wish but keep it large
int choice; bool lock=false;
char LOCKEDFILENAME[] = “locked.txt”;
char UNLOCKEDFILENAME[] = “unlocked.txt”;

streampos size;
union
{
long long int n;
char ch[sizeof(long long int)];
} buffer; //temporary storage for processing encryption

choiceMaker:
cout<<“\nWhat would you like to do?:\n1)Lock\n2)Unlock\n”;
cin>>choice;

//this will create a menu through which user can choose what he wishes to do.
switch(choice){
case 1:lock=true;break;
case 2:break;
default:cout<<“Invalid choice, input only (1/2).\n”;goto choiceMaker;
}

//encrypt unlocked.txt file to locked.txt
if(lock)
{
ifstream unlocked;
ofstream locked;
//creating two file streams, one for input and another for output
unlocked.open (UNLOCKEDFILENAME,ios::binary);
locked.open (LOCKEDFILENAME,ios::binary);

if (unlocked.is_open()) //checking if the file has opened successfully
{
unlocked.seekg (0, ios::end); //jumping to end
size = unlocked.tellg(); //checking the file size
unlocked.seekg (0, ios::beg); //coming back to start

while (unlocked.read(buffer.ch,sizeof(buffer))) //reading small bytes at a time
{cout << buffer.n << ‘\n’; //visual log

xor_encrypt(key,buffer.ch,sizeof(buffer)); //encrypting

locked.write(buffer.ch,sizeof(buffer)); //writing ciphered text to locked.txt
}

cout<<“\nFile size:”<<size<<” Buffer size:”<<sizeof(buffer)<<endl; //buffer size depends on process architecture and compiler. In x64 it was 8bytes
cout << “\nLocked Successfully.”;
}

//resources are cleared.
unlocked.close();
locked.close();
}

//decrypt it.
if(!lock)
{ //everything same as above
ofstream unlocked;
ifstream locked;
unlocked.open (UNLOCKEDFILENAME,ios::binary);
locked.open (LOCKEDFILENAME,ios::binary);

if (locked.is_open())
{
locked.seekg (0, ios::end);
size = locked.tellg();
locked.seekg (0, ios::beg);

while (locked.read(buffer.ch,sizeof(buffer)))
{cout << buffer.n << ‘\n’;

xor_encrypt(key,buffer.ch,sizeof(buffer));

unlocked.write(buffer.ch,sizeof(buffer));
}

cout<<“\nFile size:”<<size<<” Buffer size:”<<sizeof(buffer)<<endl;
cout << “\nUnlocked Successfully.”;
}

unlocked.close();
locked.close();

}

}

You can modify this program to accept a password every time it runs and decrypt with it. It will decrypt even with wrong password but your original content cannot be obtained. Even after successful decryption, it will still look like garbage. That’s because the XOR pass we have used can only revert it back to original. Try adding more functionality and let me know in comments!

Attachment: Download Zipped file for this project.

How to: Automate things online with IFTTT

softnuke-mail-banner

If you’re not familiar, IFTTT is a service that allows you to connect other services together to perform automated actions. It stands for “if this then that” and revolves around only this statement. It is completely free to use and allows user to create task according to personal preferences but if you are lazy enough then you can browse around and find what you could have done manually in Browse section of Recipes. The statement of if this event occurred than do this is generally known as Recipe in IFTTT. Enough of talking and let’s see what this thing is capable of:

Say you want an email notification whenever it is going to rain in your city automatically then what you need to do is:

  • Register yourself at IFTTT and navigate to Browse section.
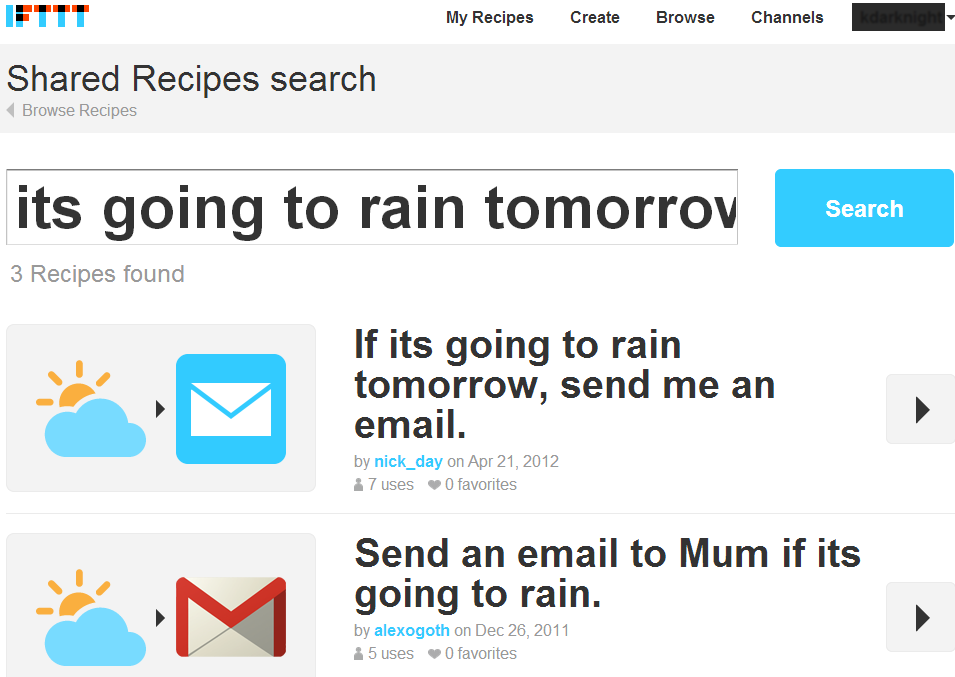
  • Type “Its going to rain tomorrow, send email” in Search box.

search-rain-mail

  • Result will list down many prebuild recipes, select one of them.
  • It will ask for your email id and your location, click “Use Recipe”. That’s it!

In the above method not only you can email but also send SMS or notification to your iOS device. This is how you can use recipes but some of them will require configuration like:

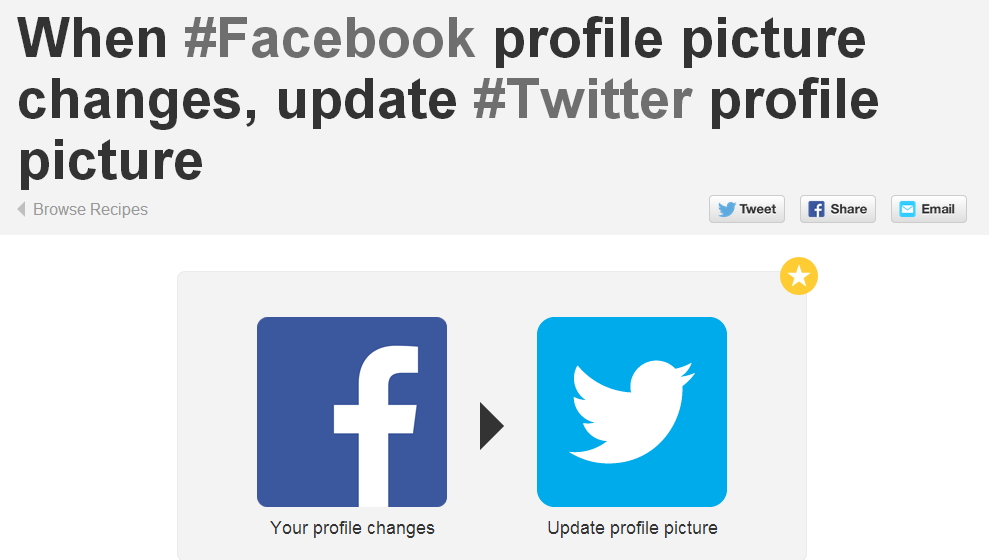
Say you want to update your twitter profile picture whenever you update Facebook profile picture then:

facebook-to-twitter-dp

  • Search for similar recipe, let us do this for you, and you will be prompted to activate channel before you can use it.
  • Click on Activate and enter your credentials, Facebook and Twitter will ask you to authorize this application to access content and profile. Do it.

activate-channel

  • Once you do this for both of them click “Use Recipe”. Isn’t this super easy?

Let’s do some more productive task but this time we will create our own Recipe. Yeah, in just 5 minutes we are doing this like a professional. Say you want an email notification every time there is a new post on Softnuke.

  • Click on “Create” in navigation and a page with “ifthisthanthat” will appear.
  • Select “this”, many Trigger channel will list down. Right now we need RSS Feed as a trigger and a Mail Channel to post the update.

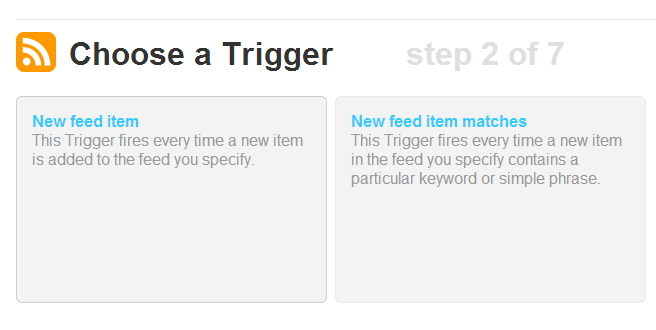
rss-event

  • Choose “Feed” and it will ask for type of event, select “New feed item”.
  • Input RSS Feed Url “//softnuke.com/feed/” without inverted quotes and create trigger.
  • Now it will ask for what to do once the event is occurred, click “that”.
  • Select “Mail” to send mail to your registered email id.

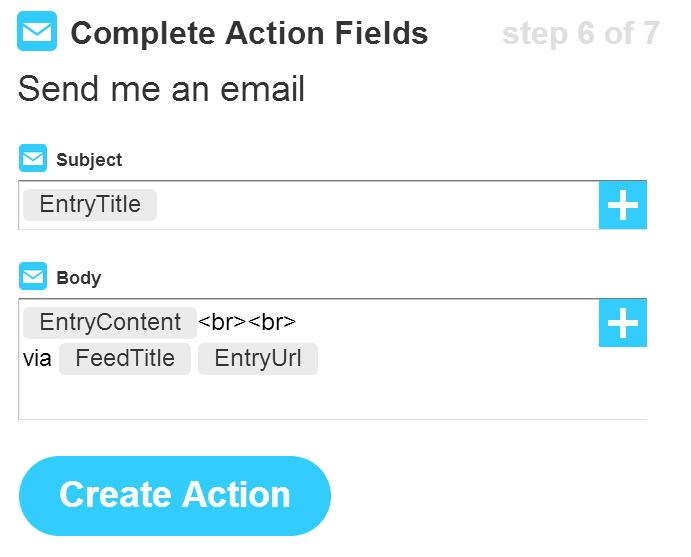
mail-options

  • It will ask for further option, modify it if you want and create trigger and then create recipe.

It is easier than it looks really. There are hundreds of combination you can achieve, some of good combination could be:


How to: Install Windows on Mac via Boot Camp

A Mac is built for compatibility, supporting all industry standards; Mac OS X is almost fully compatible to windows. For those for whom even this isn’t enough, there is Boot Camp. Boot Camp is a utility included in Mac OS X 10.5 Leopard onwards that allows you to dual boot Microsoft Windows with Mac OS X. It guides you through easy re-partitioning for windows, assists you by installing a boot loader so that you can choose the OS to boot into at the time of startup, and adds a Boot Camp control to the Microsoft windows control panel so that these settings can be modified from there also.

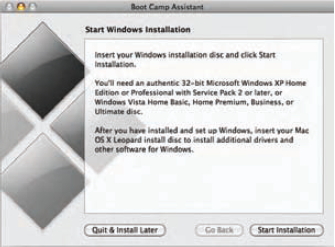
Here is how to go about dual booting Windows on your Mac. Go to Application/Utilities from your task bar and run the Boot Camp Assistant over there. It is a simple wizard like interface that takes you through the following processes.

bootcamp-install

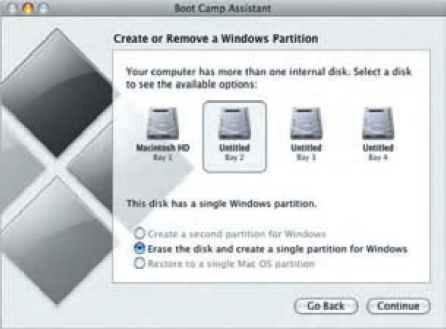
1. Creating a partition on your hard disk for Windows: Allowing for nondestructive re-partitioning of your hard disk (without losing any data), this menu comes with three options, you can choose to use a 32 GB partition for Windows, split the hard disk 50-50 between Windows and Mac OS, or manually choose a size. When manually choosing a size, remember to make the Windows partition at least 5 GB in size, while the partition with Mac OS currently installed in it should at least have 5 GB left free. If you have multiple internal hard disks, it is advisable to keep your Windows partition on a different disk.

bootcamp-partition

2. Start Installing Windows: Once partitioning is done, you will be back to the main Boot Camp menu, from where you have to select “Start the Windows Installer”. Follow the menu until you are asked to insert your Windows disk. Soon your computer will restart and boot from the Windows DVD.

(Note that if you are attempting to install Windows XP, it has to be SP2. You cannot install a basic Windows XP and attempt to upgrade to SP2 later.)

bootcamp-win-format

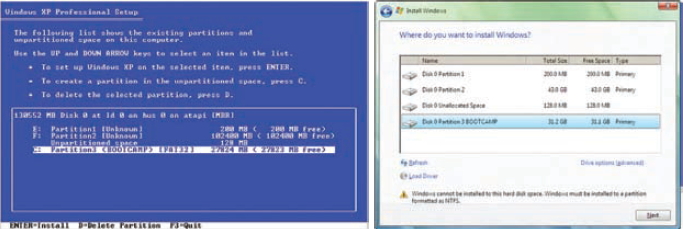
3. Choosing your partition: Follow the simple on screen instructions until you arrive at the choose partition menu.

You need to be careful doing this step. Select only the partition labeled – Partition* <BOOTCAMP> (where * is a number such as 1,2,3). Only one partition will have a name in that format. Choosing any other partition might wipe out your Mac OSX along with all your data from your computer. If you are installing Windows 7, the partition will appear as Disk * Partition * BOOTCAMP.


4. Formatting your Partition: Now you will be asked if you want this drive to be FAT or NTFS, i.e. to choose its file system. Windows 7 requires NTFS, so it will by default format your partition as NTFS without asking you. Also if the partition is 32 GB or more in size, it has to be NTFS. However, if the disk is made NTFS, it will be read only (you cannot modify files or write new ones) while running Mac OS X. So make your choice wisely.


5. Installing Drivers: Your Mac OS X CD that came with your Mac also contains windows drivers and Boot Camp components to ensure flawless functioning of windows on your system. To install these drivers, once you are logged into Windows, (after the whole installation process is over), insert he Mac OS X DVD. If auto run is disabled, you will have to open the drive in my computer and run setup.exe manually for drivers.


bootcamp-startup

Otherwise, it will start automatically. The setup will install drivers for all your built in Mac components. However, some external add on peripherals such as external iSight webcams might not be supported this way. You are advised to go to the Apple web site for these drivers. Your computer might need to restart few times.

bootcamp-controlpanel

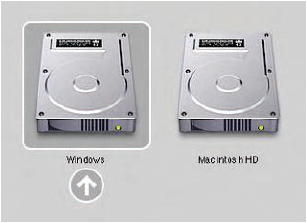
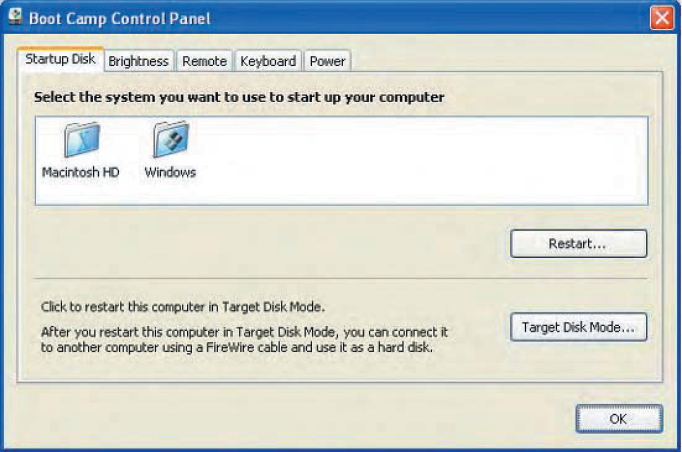
6. Setting up your default start up: Thanks to the Boot Camp control panel installed in your Windows control panel, this can be done from both Windows and Mac OS X. In Mac, go to System Preferences > start up disk (found either on the dock or using finder). In the menu that shows up, you can choose your default operating system. In Windows, this can be done using Control Panel > Boot Camp Control Panel. This menu also offers you the unique feature of using your computer as a target disk. To do this, select the disk of choice, Windows or Mac OS X and click target disk mode.

Once your computer restarts, you may use its fire wire port to connect it to any other computer and use it as an external hard disk. This may be done in extreme cases for data recovery or restoration.

You can also quickly boot into Mac OS X while using windows by right clicking the Boot Camp system tray icon and choosing restart in Mac OS X.

An alternative is Vmware Fusion. It also has many of the popular features such as support for Boot Camp. However, many of the seamless virtualization features such as coherence are missing.


Note: Before installing Boot Camp, always back up important data. “Precaution is better than cure.”


How to check if two PCs are connected in a network

So you are trying to establish a network between two computers and you have no idea whether they are setup correctly. To check if the connection is able to send and receive data, windows have a inbuilt service through which we can check the connectivity by sending and receiving some bytes of data from your pc to target computer.

If you have wired them through switch or router, you should always first check the LED on  Ethernet port. That LED should be blinking in most of the cases but if it’s not then you might have not connected them properly.

Follow these simple steps to check even if they are connected wirelessly:

1)      Get the IP of target machine.

2)      Open Command Prompt, by hitting (Windows+R) key and then typing cmd. Windows key is placed besides ALT key or you can go to Start > All Programs > Accessories > Command Prompt.

no-connection

Request timed out because of connection errors.

3)      Once the Command prompt is open, type “ping <ip address of target machine>”. For example :

ping 192.168.1.3
connected

Connected successfully! For the sake of example i am pinging to my myself.

It will start sending some packets to the machine , if the response is received it means your connection is working fine. But if request timed out then there might be some problem.

How to: Add custom icon on Removable Drive

Did You Notice, whenever you insert a game CD/DVD, an icon is used over the drive. By default windows will put a simple Disk image over it. Game developers and software designers generally use their company logo to show off some style.

You can also do this simply to your Removable Drive (Pen Drive, CD and DVD). Most of the people must have seen an “autorun.inf” file inside CD/DVDs. This file is responsible for automatically executing application or start setup when the disk is inserted. This file is also capable of adding custom icon to it. For this:

1) Open Microsoft Notepad or any other text editor.

2) Write the following code in it:

[autorun]
ICON=your_icon_name.ico

3) Now save it but not with a .txt file extension, name it as “autorun.inf”. Make sure you set extension right.

autorun

4) Simply copy this file and icon file to root of your Removable Drive.

Explore-drive

Remember! The “your_icon_name” MUST be replaced with the name of icon file. You can use icons embedded in a *.dll file by placing the dll file under the icon tag, and then index it.

Eg: icon=”shell32.dll, 5”

Bitmap (*.bmp) files are also supported for this action (but not recommended). There are some other tags that can be used other than icon in autorun.inf file, like: label, open, action. We will discuss rest in some other articles.

Tricky VLC Media player features you were ignoring until now

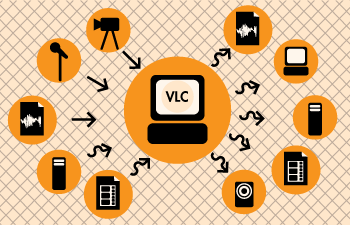
VLC is a free open source media player developed by VideoLAN. For quite some time now it has been the most popular media player across all platforms. Despite a minimalistic and frankly, dull GUI, VLC has held ground due to provision of large support for variety of audio and video formats. Well, besides being solid media player VLC has some amazing features that are not so obvious first hand. This section will introduce you to a few tips and tricks to harness the inbuilt power of VLC. Tests have been done on the latest version of VLC for Windows which can be downloaded from the official VideoLAN website: www.videolan.org.


Convert audio and Video

VLC is quite a handy native audio and video converter. Using VLC you convert an audio or video file to a variety of available formats. What’s more, you can also extract the audio from a video and save it as an MP3 file. Quite a handful for a media player we should say.

convert

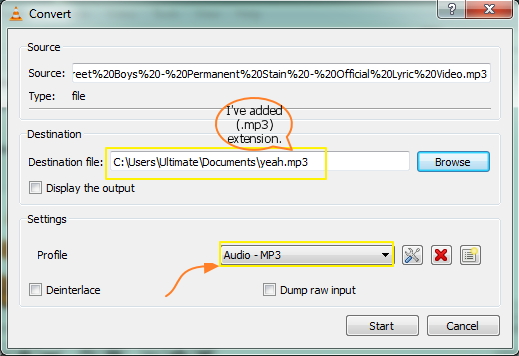
To convert a file, simply go to Media-> Convert/Save. In the window that opens you can add the file you want to convert and click on Convert. In the new window that opens select destination folder for saving the converted file.

convert and save

Choose the output format in the Profile drop box and click on Start. Don’t forget to change the extension of the output filename.

Record Video

VLC gives you the option of recording videos you are watching from a DVD, etc. For enabling this feature you will have to enable advance control option by View-> Advanced Controls. Enabling this option will add a set of buttons above your regular buttons in the standard GUI.

record

Click the left most button to start recording and click it again to stop recording. The recorded video is saved in My Videos folder inside your Home folder or in Libraries->Videos.

Rip Video

Yes you heard right. Your innocent media player apparently is a part-time ripper as well. It goes without saying that the rip facility of VLC will not be as powerful as commercial software like NERO. Copying DVD’s and general audio is fine but copying heavy formats with higher resolution can become a test of patience. Well, since VLC is marketed as a video player, a rip ability add-on is quite a nifty value addition. To copy from CD simply follow file conversion instructions. Go to Media-> Convert/Save. Instead of adding a file from your existing videos, simply click on the Disk option between File and Network options. Clicking on Convert/Save will open the usual file conversion window where you can select destination folder and output type. If you want a simple copy of disk contents without conversion check the dump raw input box. Click on Start to enable the process.


Will continue some more in next post.

How to: Create folder that no one can access not even you

These type of folders generally known as Private folders. To make Private folder which nobody can open, delete, see properties, rename we need to modify its permission for system. This can either done by going to its Properties > Security Tab or through Command Prompt, we will going to discuss later one.

  • First create a simple folder that you normally create.
  • For example- “softnuke”, in D drive so the Directory will look like “D:\softnuke”.
  • Open command prompt (Win+R ,type cmd) and then input the following command on the screen.
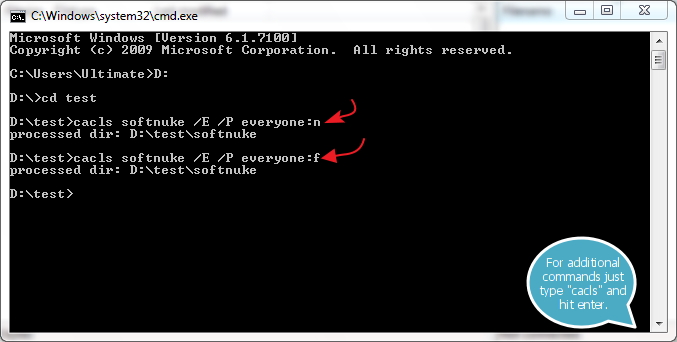
CD D:

This line is to change our directory to D drive where our folder “softnuke” resides.

Cacls softnuke /E /P everyone:n

This line sets permission of everyone to deny from any access. “n” after everyone is used to set none.

Now the folder is inaccessible from any user even from administrator. To access that folder again try the following command.

Cacls softnuke /E /P everyone:f

And the folder is accessible again. We have used “f” to set Full permissions to everyone.

cacls-command-cmd

You can use this method to store valuable assets and documents which you don’t want to be deleted or want no one to temper with.

You can fasten this by creating 2 “.bat” files. One file will be used for setting permissions to none and second for full permissions. Here is an example just edit it with notepad to adjust by your needs. You need to modify the name of folder and copy both of the files in same folder where your target folder is stored.  :

Bat File 1 : Download

Bat File 2 : Download

bat-files-structure


Note: Your browser may show you that this file is malicious but trust me thats only because “.bat” file is powerful enough to execute any cmd command thats why its warning you not to download these type of files from untrusted sources. But Softnuke will never going to harm its readers and you can download that file without worrying much.

Howto: Create a File of whatever size you want in Windows

You can create a file of any size using nothing more than what’s supplied with Windows.

There comes a time in every developers life where they need a data file for testing purposes and there are none handy. Rather than searching around for a file that fits your needs, the easiest thing to do is simply to generate one. There are a number of reasons why you might want to generate a data file. For example, recently we needed to test the file upload functionality of a little application we were writing at work, using a whole range of files of different sizes (from <1Mb up to >100Mb).

Rather than hunt around for files that would fit the bill, it was a lot easier to just generate some. Another reason might be when you need to test some functionality (e.g. algorithm) to see how it would handle very large sets of data. Since you normally don’t have files that are 1Gb or more in size just lying around, generating some is probably a good way to go.

Start by converting the desired file size into hexadecimal notation. You can use the Windows Calculator in Scientific mode do to this. Suppose you want a file of 1 million bytes. Enter 1000000 in the calculator and click on the Hex option to convert it (1 million in hex is F4240.) Pad the result with zeroes at the left until the file size reaches eight digits—000F4240.

  • Now open a command prompt window. In Windows 95, 98, or Me, you can do this by entering COMMAND in the Start menu’s Run dialog; in Windows NT 4.0, 2000, or XP/Windows7 enter CMD instead.
  • Enter the command DEBUG BIGFILE.DAT and ignore the File not found message.
  • Type RCX and press Enter. Debug will display a colon prompt. Enter the last four digits of the hexadecimal number you calculated (4240, in our example).

cmd-commands-large-size

  • Type RBX and press Enter, then enter the first four digits of the hexadecimal size (000F, in our example).
  • Enter W for Write and Q for Quit. You’ve just created a 1-million-byte file using Debug. Of course you can create a file of any desired size using the same technique.

cmd-commands-large-size-dir


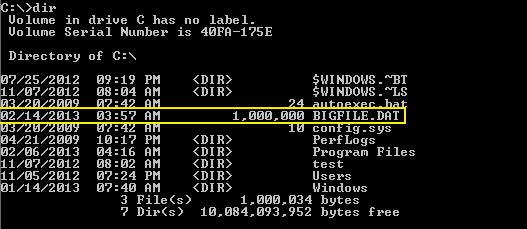
In the above screenshot you can see “BIGFILE.DAT” with size of 1,000,000 bytes.

cmd-commands-large-size-explorer


This is the screenshot from explorer. Now you can create file of whatever size you want according to needs.

How to: Hide your data in a Audio Song

Introduction

Due to the way different file types are read it is possible to have a single file that acts differently depending on how it is read. For example sounds & images are read from the header down whereas ZIP files are read from the footer up.

All sound files should work, but some are more unpredictable that others. Mp3s seem to be the most reliable so this tutorial will be using them in the examples (plus who doesn’t love mp3 songs). All the steps are same if you want to use an image(.jpg) instead of sound.

How to create one

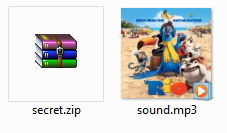
Firstly get hold of a sound file you want to hide the data in (example sound.mp3), then gather all your files you want to hide and put them in a ZIP (example secret.zip).

Our chosen Sound and zip file:

sound-secret-files

Windows 7: Shift+right click in the folder containing the files will open command prompt in that directory Windows: Open command prompt (start->run cmd), then use cd to get to the folder where the files are stored. Linux: You know what to do, open terminal and move to directory containing files.

We now need to merge these files together, but we want to use a binary merge to keep the two files intact. With Windows copy command this uses the /B switch. (Binary Data)

Windows

Code:

copy /B sound.mp3+secret.zip newfile.mp3

Linux

Code:

cat sound.mp3 secret.zip > newfile.mp3

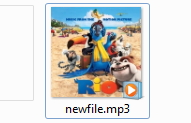
You should now have gained a new file called newfile.mp3. This should look identical to the sound you started with when opened with a media player, but with a secret payload hidden within. Here is the example sound containing a ZIP:

sound-secret-files-command

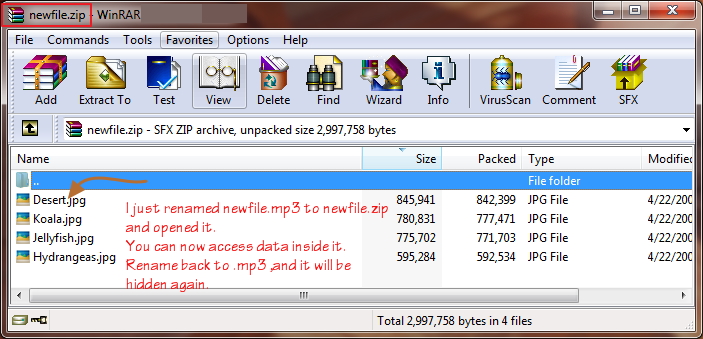
The two simplest ways to get your data back out of these files is to either change the extension from .mp3 to .zip or to open your chosen ZIP program and open newfile.mp3 within that. You should now be presented with your original files.
sound-secret-files-access-data

One more way of getting your .zip file back is to run this code:

copy /b newfile.mp3 file.zip

This is clearly not a secure way to store your data but as a quick and dirt solution to hide files it works well enough. If you are storing text documents in the ZIP then the contents of them will still be visible in a HEX editor looking at newfile.mp3. There are much better steganography tools that use encryption keys to securely store your data within other files.

This method only appends new data (from secret.zip, in this article) into after the footer identifier of mask file (sound.mp3). Good media player will only read from header to footer, and will not read further than that. So whatever data we add will not be read, and the original file will remain in good condition. only it’s size is changing because we add more data into it. The same applies to every file which has header and footer identifier (e.g. jpeg, png, gif, mp3, mp4, exe, and most of known file format).

How To: Edit default location for installing Apps permanently

Fed up of changing the location of directory where your game or application should be installed? Then this solution is for you, as the size of hard drives increase, more people are using partitions to separate and store groups of files.

Windows uses the C:\Program Files directory as the default base directory into which new programs are installed. However, you can change the default installation drive and/ or directory by using a Registry hack.

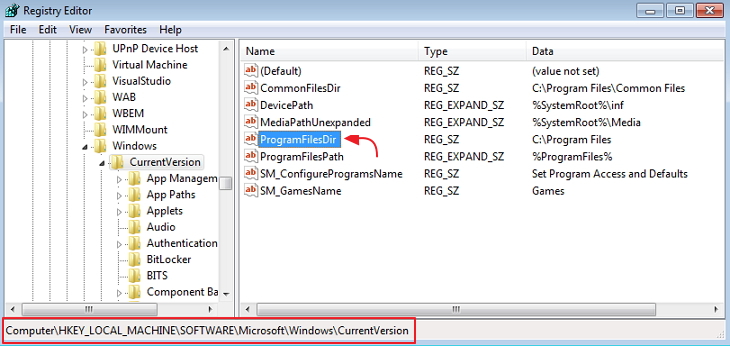
Run the Registry Editor (regedit)and go to

HKEY_LOCAL_MACHINE\SOFTWARE\Microsoft\Windows\CurrentVersion

change-default-installation-dir

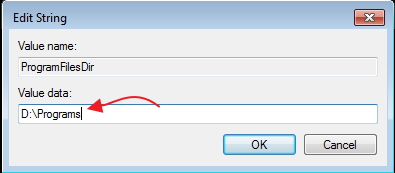
Look for the value named ProgramFilesDir. by default,this value will be C:\Program Files.

change-default-installation-dir

Edit the value to any valid drive or folder and XP will use that new location as the default installation directory for new programs.

Don’t forget to take backup of registry first in case you messed up.