How to: Create & Share your very own QR code

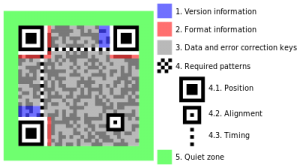
Recently, the QR Code system has become popular outside the automotive industry due to its fast readability and greater storage capacity compared to standard UPC barcodes. The code consists of black modules (square dots) arranged in a square grid on a white background.

QR_Code_Structure

QR codes can be used in Google’s Android operating system and iOS devices (iPhone/iPod/iPad), as well as by using Google Goggles, 3rd party barcode scanners, and the Nintendo 3DS. The browser supports URI redirection, which allows QR codes to send metadata to existing applications on the device.

QR Codes are an incredibly useful mobile marketing tool. Simply scanning a text is way easier than typing it on a tiny on-screen keyboard. Save your visitors time and thus increase your click rates!

qr-code-create

QR Codes make it possible to directly transfer a link to a mobile device. This greatly lowers the barrier to visit a website with such a device. But there’s more: You can also transfer your slogans, phone numbers or even complete business cards in the vCard format can be encoded with our QR Code generator and transferred to mobile devices. We are using goqr.me to demonstrate in this tutorial. Some other useful sites are : kaywa,  QR Code Generator, qrstuff.

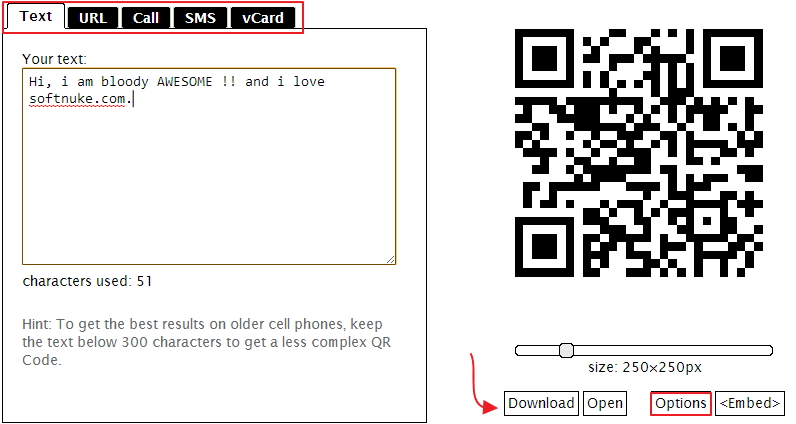
  • Just type your text, URL, an SMS or your contact data here on goqr.me—the QR Code is created automatically.
  • You will see 5 Tabs from which you can select, say we choose TEXT.
  • Input whatever you want to generate at the time of scan.
  • And you are done, you can customize its color & style by clicking OPTION Button.

Now share it with your friends and family through social networks. Application that can be used to scan these QR/BAR codes is here [Barcode Scanner]. This app can also create some useful QR code inside your smartphone.
Web: Split Screen in your Google Chrome

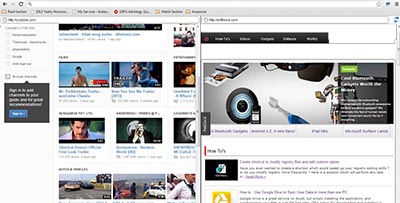
Split Screen does exactly what the name suggests. It creates a new chrome tab that will let you browse two different sites at once. If 40 open tabs weren’t enough, you can now literally double the number of sites you view simultaneously. Just imagine a boring spreadsheet on one page, YouTube on the other. Work and play at the same time, what more could you ask for ?

Get it from here

Prompts the user for two URL addresses and then displays both in one window!

Opens a new tab and prompts the user for two URL’s, then displays both sites on one page. Great for cross-reference studying and surfing the web in general! Watch a video, (or wait for it to buffer) while you surf another webpage.

split-screen-chrome

Now has a fully customizable options page… Choose your default webpages to load on opening the extension…

Equipped with a notepad which saves whatever you write for the next time you use the extension… great for studying!!!

Click and drag a bookmark into the URL field…

TURN ON AUTOCOMPLETE to make typing in URL’s faster! : Go to tools – options – personal stuff – and enable “form autofill”…

Press F11 for full screen.

DIY : Create Self-Destruct Messages with Google Docs in Mission Impossible Style

It’s a clever technology, as well as a manifestation of an interesting argument that some legal and internet scholars have begun to make: All information should have an expiration date.  This means, once they read the message they will no longer be able to read it again after the timer has reached zero. This ensures your message is read by no one but the reader and all evidence of the message is erased.

You can send passwords and other private information as self-destructing messages in Google Docs that will vanish after being read.Would you like to send a confidential note to a friend that self-destructs after it has been read so that no one else (including your friend) can ever see that secret note again?

There are web apps – like OneShar.es and Burn Note – that offer an easy solution. They essentially create a temporary web page/link that auto-expires after it has been viewed once.

Alternatively, you can even use Google Docs to send self-destructing messages to anyone through Google Apps Script.

Creating Messages in Google Docs

This message will self-destruct in ten seconds. It takes a minute to convert a Google Docs sheet into a self-destructing one. Just follow this :

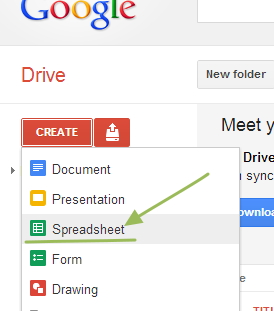
  • Open your Google Docs account and create new spreadsheet.

self-destruct-google-docs

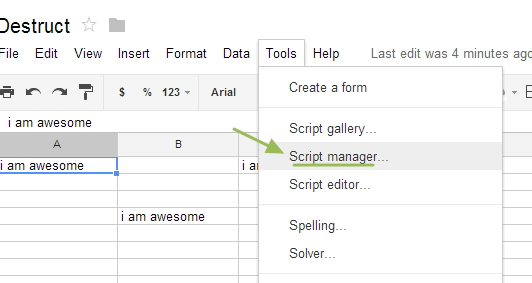
  •  Input your data that you will be sharing with your friend. Then go to Tools > Script Manager, a new tab will be popped.

self-destruct-google-docs-script-manager

  • Select Blank Project in the title menu. An editor will be available in your browser, copy-paste Script to this editor from below this page and save it.

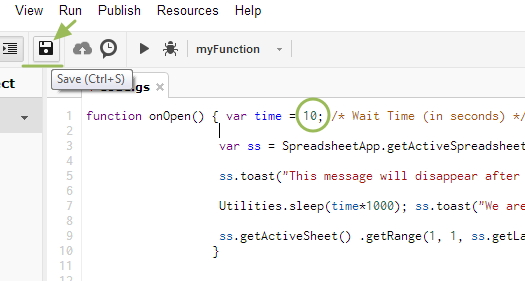
self-destruct-google-docs-script

  • Don’t forget to change value of time variable according to your need (seconds to wait before cleanup). Hit Save icon.
  • Now close Script editor window, Open again script manager by going to Tools or hit Reload if it is already opened. You will find your script listed there.
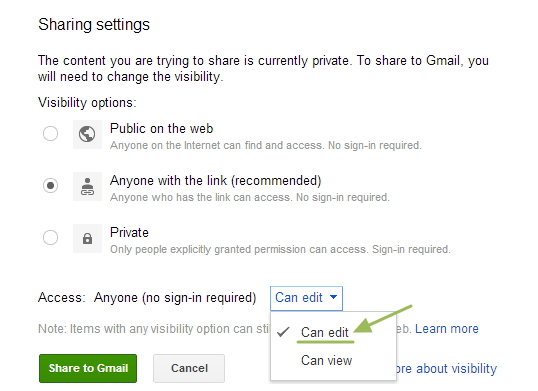
  • Lastly, Click on Share button available in top-right corner of the screen. Change Access from CAN VIEW to CAN EDIT. Then Share it.

self-destruct-google-docs-sharingMake sure the permission is set to “Can Edit” in the sharing window.

Your friend opens the sheet, reads the message and after 10 seconds, the entire sheet on his screen will clear itself. If you wish to send another self-destructing message, create a copy of the original sheet and repeat the steps.

How does it work?

The trick is simple. We have an onOpen trigger attached to the Google sheet that becomes active as soon as the sheet is opened. This trigger waits for 10 seconds (Utilities.sleep) and then runs the clear() command to empty all the cells of the sheet.

Here’s the Google Apps Script code that actually makes your “secret message” vanish.

function onOpen() {

var time = 10; /* Wait Time (in seconds) */

var ss = SpreadsheetApp.getActiveSpreadsheet(); ss.toast(“This message will disappear after ” + time + ” seconds. So read fast !!!”);

Utilities.sleep(time*1000); ss.toast(“We are now sending this private note to the shredder. Bye :)”);

ss.getActiveSheet() .getRange(1, 1, ss.getLastRow(), ss.getLastColumn()).clear(); }

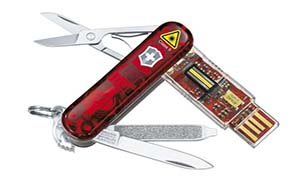
Victorinox Presentation Master : Swiss Army Knife

This is one Swiss Army Knife and USB drive combo that is perfect for James Bond. However, if you aren’t the famed MI6 agent, but a salesman who travels a lot and cares an awful lot about your data’s security, you can think of buying the Victorinox Presentation Master, too. Apart from a small knife, nail file and scissors, this Victorinox tool comes with a 32GB USB drive that enjoys AES 256-bit hardware and software encryption. It also supports plug-in-play Powerpoint presentation slides. If your presentation skills don’t blow away your audience, may be the act of plugging in a Swiss army knife into a PC or projector port will.

The explanation for the Presentation Master name is that there’s built-in Bluetooth so you can control PowerPoint presentations with the forward and back buttons. A button on the opposite side controls a handy laser pointer.Write speeds of 5.6MB/s aren’t great, but read speeds of just over 20MB/sec are impressive.

Test Notes

  • Setting up the drive for the first time can be daunting—you’ll have to capture images of all five fingers on one hand and the drive seems a bit finicky about what constitutes a “good” image of the digit—but once you do, it will reliably unlock with a quick finger swipe.
  • The Demolition Man hack—cutting off a finger or an eye—won’t work on this. The fingerprint scanner checks the oxygenation level of the blood flowing through your finger as you swipe. No living tissue, no access.
  • The drive also recognizes brute force attacks—and responds by feigning being cracked, displaying dummy folders filled with innocuous files—as well as increases in voltage or current.
  • The only way I could make this more secure is to handcuff it to my wrist.

The fingerprint reader is a tad fussy. It took about eight tries before our swipe was accepted. Were we done yet? Nope. The software asks for a second, backup fingerprint to be recognized, and it has to be from your other hand. (In case of emergency field amputations, one assumes.) Again it took no less than eight swipes for the print to be accepted.

The final, and possibly most mind blowing feature is an actual self destruct feature. If the drive detects someone trying to hack their way into your files, it will physically blow itself up. Obviously, this doesn’t involve explosives, but the developer of the Swiss Presenter had a unit with him that had deliberately been blown up, and the memory chip really is blow to pieces inside its case.

Victorinox are so confident that they have developed the most secure USB drive in the world, that they were offering a $100,000 prize to anyone that could access the data stored on a drive at their CES booth. As the show came to an end, nobody had succeeded in hacking their way into the drive.

Control your pointer with WiFi Mouse App

No need to use your old tech mouse in this era where Android/iOS is making its mark of gadgets. Transform your phone/tablet into a wireless mouse, keyboard and trackpad using WiFi Mouse. WiFi Mouse supports speech-to-text as well as multi-finger trackpad gestures. WiFi Mouse enables you to control your PC, MAC or HTPC effortlessly through a local network connection.

XDA Senior Member Williams Joe offers up computer control app. In the above video XDA Developer TV Producer TK reviews Wi-Fi Mouse. TK shows off the application and gives us his thoughts, so check out this app review.

Features:
* Mouse curser movement
* left and right click support
* Middle mouse button scroll
* Remote keyboard input
* PC/Mac hot keys and combination key
* Speech-to-text input for all languages
* Mouse & keyboard full screen
* Auto-connect on application startup
* Compatible with XP/Windows Vista/Windows 7/Windows 8/Mac OSX.

Gestures:
* Tap-to-click
* Two finger tap for right click
* Two finger scroll
* Pinch to zoom
* Three finger drag & drop or highlight
* Four finger swipe down to show desktop
* Four finger swipe up to maximise current window
* Four finger swipe sideways to change current window focus
* Left handed mouse support (swap left and right mouse click)

How It Works

For an app this advanced it’s fairly easy to set up, all you’ve got to do is install the app from the Play Store and then install the Server software. I can’t speak for Mac Users but the installation on Windows was pain-free and more importantly – safe and unobtrusive.

After that all you have to do is open up the app on your phone and then either click auto-connect and wait for the magic to happen. I manually entered the IP address because I really don’t trust Windows and networking but in testing both worked fine.

Conclusion

To control a PC off in the distance or just use touch for a change through your smartphone is brilliant. Its execution is good as well, a solid application that serves it’s purpose almost flawlessly. These apps were all the rage some years ago and whilst you could say this app is trying to revive a trend I’d disagree because the app changes the rules and gives you an experience that touchpad manufacturers have struggled to deliver in laptops for years – through your smartphone.

Get the app from Play Store.

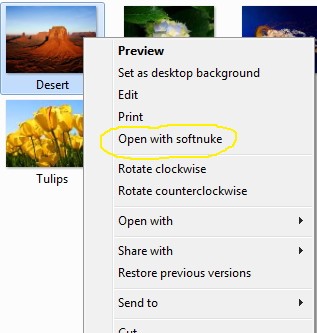
Create shortcut to modify registry files and add custom context menu

Have you ever wanted to create a shortcut which would speed up your registry editing skills ? or do you modify registry more frequently ? Here is a solution which will perform any task in less than 5 seconds. We will explain this tutorial by adding a custom option in windows Right Click Context Menu of a file. [Not Folder]

  • First, we’d launch Notepad or another text editor.
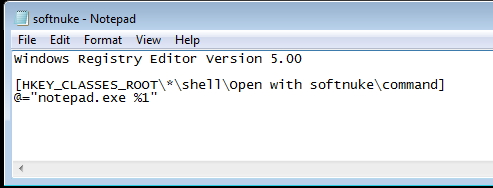
  • Next add this line at the top of file.

“Windows Registry Editor Version 5.00”

  •  After it add a blank line.
  • To create a key Directory in registry, add full path of it.

[HKEY_CLASSES_ROOT\*\shell\Open with Softnuke\command]

  • Now add name of key and its value in this format “”=”value”, value could be path of any file with which you want to open.

@=”notepad.exe %1”

  • %1 is used here to provide path of the specified file on which Right click is to be done and @ means default key in directory.

registry-shortcut-open-with-softnuke

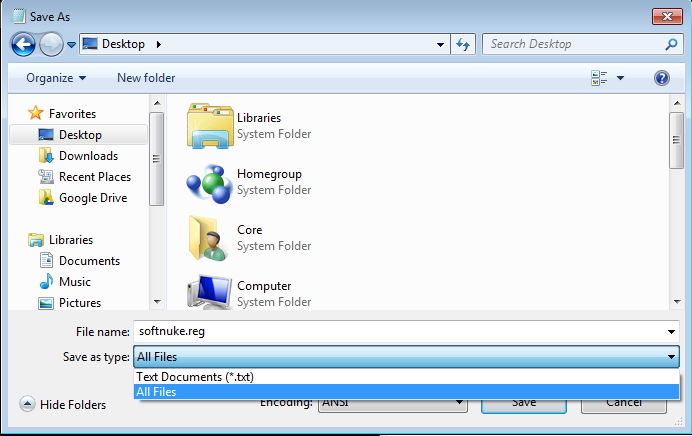
  • Now save it as “softnuke.reg”. Always Save the file with the .reg file extension. You can double-click it to add the information to your registry.

A single .reg file can contain multiple entries, so you could have one .reg file that installs all your favorite shortcuts.

registry-shortcut-save

Now can use it the way you like, here is another example : Enable/Disable access of USB

Windows Registry Editor Version 5.00 [HKEY_LOCAL_MACHINE\SYSTEM\CurrentControlSet\services\USBSTOR\] “Start”=dword:4
  • Finally, to delete the folder and all its continents create a .reg file similar with (-)minus sign in front of its directory.
Windows Registry Editor Version 5.00 [-HKEY_LOCAL_MACHINE\SYSTEM\CurrentControlSet\services\USBSTOR\] “Start”=-

For any Queries please comment below.

registry-shortcut-context

Note: Users running earlier versions of Windows may want to substitute Windows Registry Editor Version 5.00 with REGEDIT4.

How to : Use Google Drive to Sync User Data in more than one PC

Google Drive is a great service no doubt, but simply installing the application, and synchronizing your files is just the first step. (The option for downloading and installing is available on the homepage of your online Google Drive at the bottom of the sidebar)

You can move your user data folders (Documents, Pictures, Music, Videos and Downloads) by right-clicking the folder and changing the destination path under ‘Location’ tab in the Properties menu.

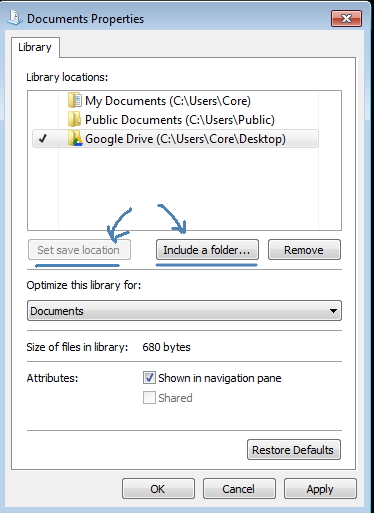
  • Windows 7 users need to go to the Explorer panel to the left, Expend the collapsible Library folder, and right-click the “My Documents” or similar folder to get the properties menu.
  • Click on “Include a Folder”, Browse to Google Drive Sync Folder. Select “Set Save location”.

document-properties

  • Change the location of one of these folders to your Google drive folder to synchronize it between computers. Do this on each computer you use and you’ll have the same files in your Documents, Downloads, and all other folders on all your computers.

Note: If the amount of data you have exceeds the storage capacity of Google Drive (that is, if the data if more than 5 GB), then the above method will fail to completely transfer all the files. Once the storage limit of Google Drive is reached, you will unable to add any more folders/files to it, and in this case, to your user data folders as well.